
In This Article
Somewhere in every home improvement store, a first-timer is standing in the fastener aisle holding two nail guns that look almost identical and cost $200 apart, wondering which one will actually get the deck built. That confusion is the whole reason this guide exists. types of nail guns explained in plain English means understanding that a nail gun isn’t one tool — it’s a family of tools, each built around a specific nail size, a specific job, and a specific magazine design, and grabbing the wrong one is how you end up with split trim or a jammed framer on a Saturday afternoon.
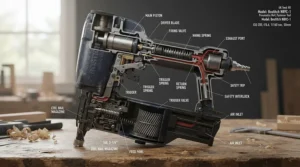
Here’s the short version, since you’re probably in a hurry: a nail gun is a power tool — pneumatic, cordless-electric, or battery-powered — that drives collated nails using compressed air, a solenoid, or a combustion/battery-driven piston instead of a swinging hammer. What separates one type from another is nail gauge (thickness), nail length, and how the nails are collated (strip, coil, or clip) inside the magazine. Get those three variables right and the “which nail gun” question mostly answers itself.
This piece walks through seven real, currently available nail guns spanning framing, finish, brad, roofing, and siding work — with honest analysis of what each one is genuinely good at, not just a spec dump. We’ll also get into sizing, collation angles, shank diameters, magazine capacity, and the safety habits that keep this admittedly slightly terrifying tool from ruining your week. The nail gun as we know it traces back to a 1950s adaptation of aircraft-assembly tooling — worth a quick read if you’re curious how a Howard Hughes project ended up powering your deck build — but the tools themselves have changed enormously since then, especially with the shift toward cordless.
Quick Comparison Table
Before we go deep on all seven picks, here’s the fast version for anyone who just wants the shape of the market.
| Nail Gun | Type | Nail Gauge/Size | Power Source | Price Range | Best For |
|---|---|---|---|---|---|
| Milwaukee M18 FUEL 21° Framing Nailer | Framing | .113″–.148″ shank, 2″–3½” | Cordless (18V) | $400–$470 | Pros wanting cordless framing power |
| Metabo HPT NR90AES1 | Framing | .113″–.131″ shank, 2″–3½” | Pneumatic | $250–$310 | Budget-conscious framers with a compressor |
| DeWalt DCN660 | Finish (16-gauge) | 16GA, 1″–2½” | Cordless (20V MAX) | $280–$350 | Trim, casing, baseboards |
| Bostitch Smart Point BTFP12233 | Brad | 18GA, ⅝”–2″ | Pneumatic | under $100 | First-time buyers, delicate trim |
| Porter-Cable PCC790LA | Brad | 18GA, ⅝”–2″ | Cordless (20V MAX) | $130–$170 | DIYers who hate compressors |
| Metabo HPT NV45AB2 | Roofing | Coil, 7d–12d | Pneumatic | $200–$260 | Roofing crews and shingle jobs |
| Bostitch N66C-1 | Siding | 1¼”–2½” coil | Pneumatic | $350–$420 | Fiber cement and clapboard siding |
Looking at the spread above, the split between pneumatic and cordless is really a split between upfront simplicity and long-term freedom: the Metabo HPT NR90AES1 and Bostitch Smart Point BTFP12233 cost less on the shelf but assume you already own (or will buy) a compressor, while the Milwaukee M18 FUEL and Porter-Cable PCC790LA fold that cost into the tool itself. Notice, too, that gauge and shank diameter track directly with job type — the framing nailers use the thickest shanks because they’re holding structural lumber together, while the brad nailers use the thinnest wire specifically so they won’t split delicate trim.
💬 Bookmark this table now — you’ll want to scroll back to it once you see what each of these seven can actually do.
Top 7 Nail Guns: Expert Analysis
Real products, real specs, and an honest read on who each one is actually for — no invented reviews, no fabricated “I tested this for a month” stories, just what the spec sheets and aggregated buyer feedback actually support.
1. Milwaukee M18 FUEL 21° Framing Nailer — cordless power with zero ramp-up
The standout here is speed: this nailer fires up to three nails per second with no ramp-up delay, meaning the first pull of the trigger drives just as hard as the fiftieth. That matters more than it sounds — plenty of cordless framers need a beat to “spin up” before they hit full force, which shows up as inconsistent nail seating on your first few shots after every pause.
Under the hood, it pairs a brushless motor with a sealed nitrogen spring instead of a fuel cell or hose, so there’s no combustion cartridge to restock and no compressor to drag around. It handles nails from 2 to 3½ inches with shank diameters from .113 to .148 inches, and the standard magazine holds around 43 nails per load, with an extended 78–83 nail magazine available as an add-on for crews who hate reloading mid-wall. At roughly 9.4 to just over 10 pounds bare, it’s not a lightweight, but that mass helps absorb recoil rather than kicking it back into your wrist.
Based on the spec comparison against pneumatic framers in this class, the trade-off is straightforward: you gain total cordless freedom and skip the compressor entirely, but you’re carrying battery weight and, per aggregated owner feedback in tool-review roundups, watching for thermal throttling if you run it flat-out on high-volume sheathing days. Reviewers consistently note this as one of the strongest cordless framing options for remodelers who move between job sites and don’t want a hose tethering them to a truck.
Pros:
- ✅ Fires 3 nails per second with no spin-up delay
- ✅ No compressor, hose, or fuel cartridge required
- ✅ Handles engineered lumber and dense sheathing confidently
Cons:
- ❌ Heavier than comparable pneumatic framing nailers
- ❌ Can run warm on sustained high-volume firing sessions
This one typically lands in the $400–$470 range as a battery-included kit, and for a cordless framer that eliminates hose drag entirely, that’s a fair value verdict for anyone doing regular framing work away from a compressor.
2. Metabo HPT NR90AES1 — the budget-friendly framing workhorse
What stands out on this one is simplicity: it’s a straightforward pneumatic framer that professional roundups have repeatedly flagged as one of the best value picks in the category, precisely because it does one job — driving framing nails — without a lot of extra electronics to fuss over.
It handles 2-inch to 3½-inch nails with .113 to .131-inch shank diameters, runs on a tool-free depth-of-drive adjustment, and includes a toolless jam-release mechanism, which matters more than it sounds like on a job where every minute spent digging out a stuck nail is a minute you’re not framing. Because it’s pneumatic, it also skips the weight penalty of an onboard battery — a bare pneumatic framer typically runs several pounds lighter than a cordless equivalent doing the same job.
Here’s what most buyers overlook about pneumatic framers in this price bracket: the sticker price is genuinely lower, but that number doesn’t include a compressor, hose, or fittings, which can add $150–$400 to the true cost of getting started if you don’t already own one. On paper this means the NR90AES1 is a phenomenal deal for anyone with an existing air setup — a garage, a job site trailer, a DIYer who already has a pancake compressor — and a much less obvious win for someone starting completely from scratch.
Pros:
- ✅ Genuinely low price for a full-size framing nailer
- ✅ Toolless jam release and depth adjustment
- ✅ Lighter in-hand than most cordless equivalents
Cons:
- ❌ Requires a compressor most buyers don’t already own
- ❌ Hose limits mobility and creates a jobsite trip hazard
Priced in the $250–$310 range as a bare tool, this is the pick for anyone who already has compressed air on hand and wants the lowest true cost per nail driven.
3. DeWalt DCN660 20V MAX 16-Gauge Angled Finish Nailer — the cordless trim specialist
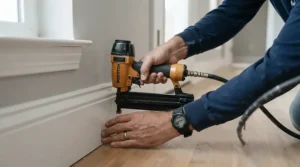
The headline feature is the angled magazine — it lets the nose slip into corners that a straight-magazine finish nailer simply can’t reach, which is exactly the situation you hit constantly around crown molding returns and tight door casing corners.
It drives 16-gauge nails from 1 to 2½ inches, which sits in the sweet spot for baseboards, door and window casing, and chair rail — thick enough to hold trim securely, thin enough that the entry hole disappears under a dab of filler rather than leaving a crater. The tool-free jam release and depth-adjustment dial mean you can dial in flush-to-countersunk seating on the fly as you move between softwood pine trim and denser hardwood casing without reaching for a screwdriver.
Based on aggregated buyer sentiment on cordless finish nailers in this class, the trend is clear: people upgrading from a pneumatic finish nailer consistently cite the freedom from a hose as the single biggest quality-of-life improvement, especially for interior trim work where dragging a compressor room to room gets old fast. The honest trade-off is battery management — you’re now tracking charge state on top of nail supply, which pneumatic users never have to think about.
Pros:
- ✅ Angled nose reaches tight corner trim work easily
- ✅ Tool-free depth adjustment and jam clearing
- ✅ No hose to drag through finished rooms
Cons:
- ❌ Battery adds weight versus a pneumatic equivalent
- ❌ Batteries and charger add real cost if bought bare
Expect to pay in the $280–$350 range for a kit with battery and charger included, which is reasonable value for anyone doing enough trim work that hose-dragging has become a genuine annoyance.
4. Bostitch Smart Point BTFP12233 — the budget pneumatic brad nailer
The standout feature is the tapered “smart point” nose design, which lets you see exactly where the nail will land — a small thing that makes a real difference when you’re nailing delicate trim pieces where a quarter-inch of misplacement matters.
This 18-gauge brad nailer handles nails from ⅝ inch to 2 inches, which covers the vast majority of light trim, cabinet backing, and craft-project fastening. The tool-free jam release and depth-of-drive dial mean beginners aren’t stuck troubleshooting with an Allen key mid-project, and the low-profile body is genuinely easy to maneuver one-handed while you hold trim in place with the other.
What the spec sheet won’t tell you, but aggregated review data consistently does, is that this is one of the most recommended entry-level brad nailers precisely because the barrier to entry is so low — it’s inexpensive enough that a first-time DIYer isn’t agonizing over the purchase, and simple enough that there’s very little to go wrong. Reviewers do note that, like most pneumatic tools in this price bracket, you’ll eventually replace an o-ring or two over years of heavy use, which is a normal maintenance item rather than a defect.
Pros:
- ✅ Tapered nose gives clear line of sight to nail placement
- ✅ Tool-free jam release and depth adjustment
- ✅ Very low price point for a full-featured brad nailer
Cons:
- ❌ Requires a compressor and hose to operate
- ❌ Plastic housing feels less rugged than premium metal-bodied models
At under $100 in most cases, this is genuinely one of the lowest-risk entry points into trim carpentry for anyone who already owns — or is willing to buy — a small compressor.
5. Porter-Cable PCC790LA 20V MAX Cordless Brad Nailer — best bang-for-buck cordless brad
The standout here is value: independent buying guides have repeatedly flagged this as the best bang-for-the-buck cordless brad nailer on the market, largely because it delivers genuine cordless convenience without the premium price tag of flagship brands.
It fires 18-gauge brads from ⅝ to 2 inches, runs on the widely available 20V MAX battery platform, and includes a tool-free jam release plus adjustable depth control. Because it shares a battery system with a huge Porter-Cable/DeWalt-compatible tool lineup, plenty of buyers already own a compatible battery before they even unbox it, which quietly erases one of the biggest hidden costs of going cordless.
Here’s what most buyers overlook about this model: the battery-platform compatibility matters more than the nailer’s own spec sheet. On paper this means someone who already owns 20V MAX tools is essentially buying a bare tool at a brad-nailer price, while someone starting from zero needs to budget for a battery and charger on top. Aggregated owner sentiment consistently praises the light weight and one-handed balance, which reduces fatigue on long trim-out days far more than raw power numbers would suggest.
Pros:
- ✅ Compatible with a huge existing 20V MAX battery ecosystem
- ✅ Lightweight, well-balanced for one-handed trim work
- ✅ No compressor or hose required
Cons:
- ❌ Battery and charger add cost if bought as bare tool
- ❌ Slightly less raw driving force than pneumatic equivalents
Typically priced in the $130–$170 range as a kit, this is the pick for DIYers who want cordless convenience without paying flagship-brand premiums.

6. Metabo HPT NV45AB2 — the fastest reload for roofing crews
The defining feature is the coil magazine, which holds far more nails than any strip-fed nailer could manage, letting roofing crews blast through a bundle of shingles without constantly stopping to reload.
This roofing nailer runs coil nails compatible with common 7d–12d roofing nail sizes, uses a depth-of-drive adjustment to avoid over-driving nail heads through shingle material (which compromises wind resistance), and includes a rubber bumper designed to reduce surface marring on the shingle you just fastened. Because roofing nailers fire wire-coil collated nails at a fairly shallow, wide angle, the tool itself sits lower and wider in the hand than a framing nailer, which actually helps balance on a sloped roof surface.
Based on the spec comparison against strip-collated alternatives, coil magazines trade a slightly bulkier tool body for dramatically fewer reload interruptions — a real advantage on a job where you’re moving across an entire roof deck. What most buyers overlook is that coil collation, while high-capacity, is more sensitive to moisture and rust if nails are left in a damp truck bed, so storage habits matter more here than with strip nails.
Pros:
- ✅ High-capacity coil magazine minimizes reload stops
- ✅ Depth adjustment protects shingle wind resistance
- ✅ Wide, low body balances well on sloped surfaces
Cons:
- ❌ Coil nails are more moisture-sensitive than strip nails
- ❌ Bulkier profile than strip-fed finish or brad nailers
In the $200–$260 range, this is squarely built for anyone doing repeat roofing work rather than a once-a-decade reshingle, where the reload-time savings actually pay off.
7. Bostitch N66C-1 Coil Siding Nailer — built for fiber cement and clapboard
The standout advantage is depth control precision — siding nailers need to drive a nail flush without crushing the siding material itself, and this model’s adjustable depth-of-drive dial is specifically tuned for that narrower margin of error.
It handles 1¼-inch to 2½-inch coil nails, which covers the range typically specified for vinyl, wood clapboard, and fiber cement siding installation, and its wire-coil magazine holds a substantial nail count to minimize interruptions when you’re working your way down a long exterior wall. The nose design is built to rest flat against lapped siding without denting the surface below it — a small geometry detail that matters enormously on cosmetic exterior work where every dent is visible from the street.
Based on real spec interpretation rather than marketing copy, the core value proposition of a dedicated siding nailer versus a general-purpose framing or roofing nailer is depth consistency at scale: driving hundreds of nails at exactly the same depth across an entire elevation is nearly impossible to eyeball by hand, and a siding-specific tool is built around solving exactly that problem. Reviewers working with fiber cement siding specifically note that the depth adjustment range accommodates the material’s added density compared to wood or vinyl.
Pros:
- ✅ Depth control tuned for cosmetic exterior siding work
- ✅ Nose geometry avoids marring lapped siding surfaces
- ✅ High-capacity coil magazine for long wall runs
Cons:
- ❌ Premium price relative to general-purpose nailers
- ❌ Overkill for small trim or interior-only projects
Priced in the $350–$420 range, this is a specialist’s tool — the right call if siding is a recurring part of your work, and a poor value if you’re only ever doing one exterior project.
✨ Ready to compare options side by side? Check current availability and pricing on any of these before your next project.
What Size Nail Gun Do I Need?
The size you need comes down to what you’re fastening, not what looks impressive on a shelf. As a quick rule of thumb: framing and structural work call for 10–16 gauge nails in a framing nailer; trim, casing, and baseboards call for 15–16 gauge finish nails; delicate molding and craft work call for 18-gauge brads; and roofing or siding calls for specialty coil nailers sized to the material spec. If you’re only ever going to own one nail gun and your projects are mostly interior trim, an 18-gauge brad nailer covers the widest range of small household jobs without the risk of splitting thin material.
The mistake most first-time buyers make is picking based on power alone — assuming “bigger gauge number, weaker gun” logic gets reversed from what people expect (lower gauge numbers actually mean thicker, stronger nails, not thinner ones). A 15-gauge finish nailer, for example, drives noticeably thicker nails than an 18-gauge brad nailer, which is why 15-gauge suits heavier trim like thick crown molding while 18-gauge suits delicate shoe molding that would crack under a thicker fastener.

Nail Gun Buying Guide: How to Choose the Right Type
- Identify your primary project first. Framing a wall needs a completely different tool than hanging picture-frame molding — match the gun to the job you’ll do most often, not the one you’ll do occasionally.
- Match nail gauge to material thickness. Thinner, more delicate materials need thinner nails (higher gauge numbers); structural lumber needs the opposite.
- Decide between pneumatic and cordless honestly. Pneumatic costs less upfront but requires a compressor and hose; cordless costs more upfront but eliminates both.
- Check magazine capacity against your typical job size. A small trim job doesn’t need a 100-nail magazine, but a full roof deck absolutely benefits from one.
- Confirm collation compatibility before buying nails. A nail gun locked into one collation angle will jam or refuse to fire with the wrong strip — always check this before stocking up on fasteners.
- Weigh the tool in-hand if possible. Anything over roughly 7–8 lbs becomes noticeably more fatiguing on overhead or extended trim work.
- Budget for the whole system, not just the gun. Compressor, hose, fittings, oil, and nails all add real cost on top of the tool’s sticker price.
Nail Gun Collation Angle Types Explained
Collation angle refers to how the nails are arranged and glued or wired together inside the magazine — not the angle at which the nail actually enters the wood, since every nail gun drives nails perpendicular to the surface regardless of magazine angle. A detailed breakdown of collation types is available from Do it Best’s technical buying guide, but the short version is this: framing nailers commonly use 21°, 28°, 30°, or 34° angles, with higher angles allowing the tool’s nose to slip into tighter framing spaces like between studs or joists, while lower angles like 15° use circular wire-coil collation that’s common on roofing nailers.
The practical upshot for buyers is simple: the angle number on the tool must match the angle printed on the nail box, full stop. Loading a 30-degree strip into a 21-degree magazine — or vice versa — causes feed jams and can damage the tool’s driving mechanism. Before you stock up on a case of nails, always confirm the collation angle stamped on your specific nail gun model, since manufacturers frequently offer the “same” nailer in multiple angle variants.
Nail Gun Shank Diameter Guide
Shank diameter is the actual thickness of the nail’s metal wire, usually expressed in fractions of an inch (like .113″ to .148″ for framing nails), and it determines both holding strength and how much the material around the nail gets displaced. Thicker shanks (closer to .148″) hold more weight and resist shear force better, which is exactly why framing nailers use them — but that same thickness is what would split a piece of quarter-round trim instantly if you tried to use it there.
Here’s what most buyers overlook: shank diameter and nail gauge aren’t quite the same measurement system, which is why the wording can get confusing. Gauge (15, 16, 18) is the standard used for brad and finish nails, while framing and roofing nails are more often specified directly by shank diameter in thousandths of an inch. When in doubt, match the number on the nail box to the number stamped on your tool’s magazine or spec sheet rather than trying to eyeball thickness.
Nail Gun Magazine Capacity Guide
Magazine capacity is simply how many nails the tool holds before you need to reload, and it swings dramatically by nail gun type — a compact framing nailer might hold 40-50 strip nails, an extended-capacity magazine accessory can push that closer to 80, and coil-fed roofing or siding nailers can carry several hundred nails thanks to their circular wire-coil design.
The practical trade-off is weight versus reload frequency: a bigger magazine means fewer stops, but it also means more nail weight hanging off the front of the tool, which shows up as fatigue on your wrist during long overhead sessions. For small, stop-and-start trim jobs, a compact magazine barely matters. For roofing an entire house or siding a full elevation, magazine capacity becomes one of the biggest productivity factors in the whole project.
Setting Up Your New Nail Gun: The First 30 Days
Getting a new nail gun dialed in takes less time than most people expect, but skipping a few basic steps is exactly how first-time users end up with over-driven nails or a jammed magazine on day one. Start by reading the depth-of-drive instructions specific to your model — every nail gun has an adjustment dial or knob, and testing it on scrap material from the same batch you’ll actually be using is the only reliable way to calibrate it, since wood density varies enough between boards to throw off your setting.
For the first few projects, keep a small maintenance routine: pneumatic tools need a drop of pneumatic tool oil in the air inlet before each use session unless the model is explicitly oil-free, and cordless tools should be charged fully before the first job rather than run on a partial charge, which can shorten long-term battery health. Common early mistakes include loading the wrong collation angle nails (covered above), forgetting to engage the safety contact tip fully against the work surface before firing, and over-tightening depth adjustment in an attempt to “fix” a nail that’s actually sitting proud because of a knot or grain irregularity rather than a depth problem. Give yourself a scrap-wood test run before every new material type, and the learning curve flattens out fast.
Real-World Scenarios: Which Nail Gun Actually Fits Your Project?
Matching a nail gun to a real situation makes the buying decision much clearer than staring at spec sheets in isolation, so here are three common buyer profiles.
The weekend DIYer building a backyard fence: budget matters, storage space is limited, and the project is occasional rather than constant. The Metabo HPT NR90AES1 paired with a small pancake compressor already sitting in the garage makes sense here — the lower upfront cost matters more than cordless convenience for a project that happens once or twice a year.
The first-time homeowner tackling interior trim: no compressor, limited tool storage, and a strong preference for the best nail gun for DIY use without a steep learning curve. The Porter-Cable PCC790LA or Bostitch Smart Point BTFP12233 both fit — the Porter-Cable if a 20V MAX battery is already on hand from other tools, the Bostitch if starting completely from zero and prioritizing lowest cost.
The small remodeling contractor doing framing and trim across multiple job sites daily: hose-dragging between rooms and trucks gets old fast, and reload speed matters under time pressure. The Milwaukee M18 FUEL 21° Framing Nailer for structural work and the DeWalt DCN660 for finish carpentry cover both ends of a typical remodel without a single hose in sight.
Common Nail Gun Problems (And How to Fix Them)
Even well-maintained nail guns run into predictable issues, and most have simple fixes rather than requiring a repair shop visit.
Nail jams mid-strip: almost always caused by mismatched collation angle or a bent nail in the strip — clear the jam per the manual’s toolless release, inspect the strip for damage, and confirm the angle matches the tool spec before reloading.
Under-driven or “proud” nails: usually a depth-adjustment issue, but check air pressure on pneumatic tools first (aim for the PSI range in the manual, typically 70-120 depending on model) or battery charge level on cordless tools before assuming the depth dial is at fault.
Over-driven nails that crater the surface: the inverse problem — dial back depth adjustment incrementally, testing on scrap between each adjustment rather than guessing at a large correction all at once.
Skipped fires (trigger pulled, no nail fed): often a magazine-pusher spring losing tension over time, especially in coil nailers exposed to humidity — a light cleaning and inspection of the feed mechanism usually resolves it.
Excessive recoil or kickback: typically tied to firing mode — sequential trigger mode is safer and reduces surprise double-fires compared to bump/contact-fire mode, and switching modes solves this on tools that offer both.
Nail Gun Safety Tips You Can’t Skip
Nail guns are genuinely dangerous tools, and the injury numbers back that up: OSHA’s official nail gun safety resource notes that nail guns send an estimated tens of thousands of people to emergency rooms annually in the U.S., and residential carpentry apprentices are disproportionately affected. That’s not meant to scare you off the tool — it’s meant to underline why the basics genuinely matter.
Always keep the nail gun’s safety contact tip fully depressed against the work surface before pulling the trigger, and understand which firing mode your tool is set to: sequential mode requires releasing and re-squeezing the trigger for every single nail, while contact/bump mode fires continuously as long as the trigger is held and the tip bumps a surface — the latter is faster but meaningfully increases accidental-fire risk for beginners. Never point a loaded nail gun at yourself or another person, disconnect the air hose or remove the battery before clearing any jam, wear ANSI-rated safety glasses every time (nail guns can eject metal fragments as well as nails), and keep your non-dominant hand well clear of the firing line rather than bracing material directly in front of the nose. If you’re training anyone new on a nail gun, spend five minutes just explaining the trigger mode difference before handing it over — that single piece of knowledge prevents a disproportionate share of first-time injuries.
Nail Guns vs Hammers: What Actually Changes on the Job
The obvious difference is speed — a nail gun drives a fastener in a fraction of a second versus several hammer strikes, which compounds enormously across a full framing job or an entire fence line. But the less obvious difference is consistency: a nail gun with correctly set depth adjustment drives every single nail to the same depth, while hand-hammering introduces natural variation from fatigue, angle, and grip as a project wears on, which shows up as visibly uneven nail heads by the end of a long day.
The trade-offs run the other way, too. A hammer never jams, never needs a battery or compressor, costs a fraction of the price, and works in situations where a nail gun’s bulk simply won’t fit — tight interior corners, delicate finish work where a single miss-fire could damage material, or quick single-nail fixes where setting up an entire pneumatic system is overkill. Most experienced tradespeople keep both in rotation rather than treating it as an either/or choice: the nail gun for volume, the hammer for precision touch-ups and the odd nail here and there.
Common Mistakes When Buying a Nail Gun
The single most common mistake is buying based on brand reputation alone rather than matching gauge, collation, and power source to the actual project — a beautifully built framing nailer is a poor purchase for someone who only ever hangs picture molding. A close second is underestimating total system cost: buyers frequently compare only the tool’s sticker price without accounting for a compressor and hose (pneumatic) or a battery and charger (cordless if bought bare), which can shift the real cost comparison substantially.
Buyers also commonly overlook collation compatibility until after purchase, discovering too late that their preferred local hardware store doesn’t stock the specific angle their tool requires — always confirm nail availability, not just tool availability, before committing. Research from the Center for Construction Research and Training’s nail gun safety resources also highlights how often injury risk correlates with unfamiliarity on a new tool, which is one more reason to read the manual and run scrap-wood tests before diving into a real project on day one. Finally, plenty of buyers skip weight entirely during comparison shopping — a tool that feels fine held for thirty seconds in a store aisle can become genuinely fatiguing after two hours of overhead work.
Frequently Asked Questions
❓ What is the most versatile type of nail gun for a beginner?
❓ Can one nail gun handle both framing and trim work?
❓ Do cordless nail guns hit as hard as pneumatic ones?
❓ How often should I service my nail gun?
❓ What size compressor do I need for a pneumatic nail gun?
Conclusion
The seven nail guns above cover the realistic spread of what most buyers actually need — cordless and pneumatic framing options, a finish nailer built for angled trim access, budget and premium brad nailers depending on whether you already own compatible batteries, and dedicated roofing and siding specialists for anyone doing exterior work regularly. None of them is universally “best”; the right pick genuinely depends on your gauge requirements, your tolerance for hose-dragging versus battery management, and how often you’ll actually use the tool.
If there’s one takeaway worth remembering, it’s that gauge, shank diameter, collation angle, and magazine capacity aren’t just spec-sheet trivia — they’re the four variables that determine whether your next project goes smoothly or ends with a jammed magazine and a trip back to the store. Match those four things to your actual job, respect the safety basics covered above, and any of the seven picks here will serve you well.
Recommended for You
- Best Cordless Miter Saw: 7 Top Picks for 2026
- 7 Best Miter Saw for Trim Work Picks in 2026
- 10 Inch vs 12 Inch Miter Saw: 7 Best Picks for 2026
Disclaimer: This article contains affiliate links. As an Amazon Associate, I earn from qualifying purchases. If you purchase products through these links, we may earn a small commission at no additional cost to you.
✨ Found this helpful? Share it with your friends! 💬🤗
