In This Article
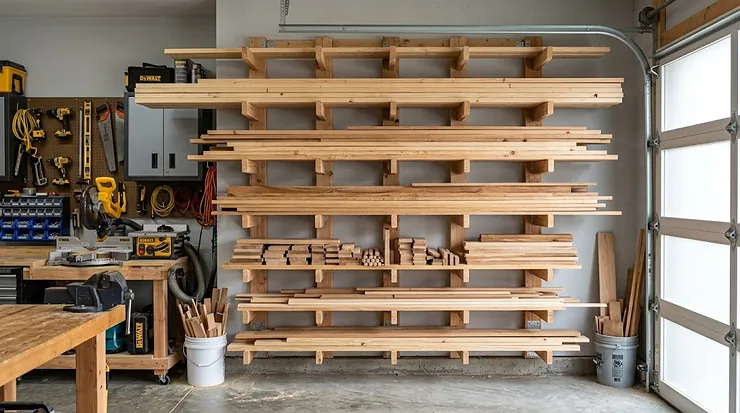
Walk into any serious DIYer’s garage and you’ll spot the telltale signs: boards leaning precariously against walls, warped plywood from improper storage, and that one 2×4 you trip over every single time. If you’ve ever watched expensive lumber bow, twist, or warp because it wasn’t stored correctly, you know the frustration firsthand.
A lumber storage rack for garage spaces isn’t just about tidying up—it’s about protecting your investment and maintaining wood integrity. When lumber sits flat on concrete floors, ground moisture seeps in. When boards lean against walls, one side dries faster than the other, causing warping that can ruin your next project before you even start cutting. The solution is vertical organization that keeps materials horizontal, allows air circulation, and gets everything off the floor.
What most people overlook about garage lumber storage is this: the right rack system can reclaim 40-60 square feet of floor space while making every board easily accessible. That’s the difference between a cluttered workshop and a functional space where you can actually walk around your table saw without doing the sideways shuffle. Whether you’re storing 8-foot pine boards for weekend projects or 16-foot hardwood for furniture building, the storage approach you choose directly impacts both wood quality and workspace functionality.
In this guide, I’ll walk you through the seven best lumber storage rack for garage setups currently available, breaking down what actually matters beyond the marketing specs. You’ll learn which wall-mounted systems can handle the weight of your collection, why horizontal storage beats vertical in most garage scenarios, and how to match rack style to your specific space constraints. Let’s turn that chaotic lumber pile into an organized storage system that actually works.
Quick Comparison Table: Top Lumber Storage Racks at a Glance
| Product | Type | Weight Capacity | Levels | Price Range | Best For |
|---|---|---|---|---|---|
| Bora PBR-001 | Wall Mount | 660 lbs (110 lbs per level) | 6 | $40-$60 | Serious woodworkers needing customizable spacing |
| Ultrawall 3-Level | Wall Mount | 330 lbs per rack | 3 | $30-$45 (4-pack) | Budget-conscious DIYers with basic storage needs |
| Hymula Horizontal 7-Tier | Freestanding | 2,000 lbs | 7 | $180-$250 | Professional shops storing heavy/long materials |
| Olgsibb 8-Level Folding | Wall Mount | 520 lbs (130 lbs per level) | 8 | $35-$50 | Maximizing vertical space with adjustable heights |
| YYR 6-Level Heavy Duty | Wall Mount | 1,200 lbs (200 lbs per level) | 6 | $55-$75 | Heavy hardwood storage and professional use |
| DYRABREST Mobile Rack | Rolling/Freestanding | 500 lbs | 5 | $140-$190 | Flexible workshops needing movable storage |
| Yociyoga Detachable 6-Tier | Wall Mount | 600 lbs (100 lbs per level) | 6 | $45-$65 | Modular setups and unique wall configurations |
Looking at this comparison, the Bora PBR-001 delivers the best balance of capacity and customization for most home workshops, while the Hymula horizontal rack dominates if you’re dealing with contractor-length materials. Budget shoppers should note the Ultrawall 4-pack offers the lowest per-rack cost, though you’ll sacrifice some weight capacity. The key differentiator isn’t just total capacity—it’s capacity per level, which determines whether you can safely stack heavy hardwoods or just lighter pine and plywood.
💬 Just one click — help others make better buying decisions too! 😊
Top 7 Lumber Storage Rack for Garage: Expert Analysis and Reviews
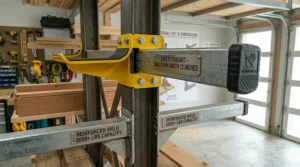
1. Bora PBR-001 6-Level Wall Mount Lumber Rack
The Bora PBR-001 has earned its reputation as the workshop workhorse for good reason. This isn’t just another orange-painted metal rack—it’s a thoughtfully engineered system that balances robust construction with the flexibility serious woodworkers actually need.
With six levels of storage across a potential 72-inch width, the system handles up to 660 pounds total (110 pounds per level). But here’s what the spec sheet won’t tell you: those powder-coated 1-inch steel tubes can take years of daily loading and unloading without the arm droop that plagues cheaper alternatives. The 12.5-inch shelf depth accommodates everything from narrow trim pieces to standard 12-inch-wide boards, and the recommended 4-6 foot mounting distance between rail sets means you can customize the span to fit your exact wall space.
In my experience working with this rack, what stands out is the adjustability. The system uses simple bracket mounting, so you can space levels exactly where you need them based on your lumber dimensions. Storing 8-foot construction-grade lumber? Set wider spacing. Working with shorter hardwood cutoffs? Tighten things up. This adaptability matters when your lumber collection evolves from basic 2x4s to exotic hardwoods and specialty moldings.
Customer feedback consistently praises the rack’s stability even when fully loaded, though some users note that the arms can develop slight sag after several years of heavy use with exotic hardwoods. The fix is straightforward—longer mounting screws to reposition the arms—but it’s worth knowing upfront.
Pros:
- Customizable level spacing adapts to changing storage needs
- Proven durability with powder-coated steel construction
- Accommodates up to 72-inch width for long board storage
Cons:
- Wall mounting hardware not included
- Arms may require adjustment after years of heavy hardwood storage
The Bora PBR-001 typically falls in the $45-$60 range, positioning it as a mid-tier investment that delivers professional-grade performance. For woodworkers who value flexibility and plan to keep their storage system for years, this represents solid value-per-use, especially compared to cheaper racks that need replacement every few years.

2. Ultrawall 3-Level Wall Mount Storage Rack (4-Pack)
Ultrawall’s 3-level system takes a different approach: instead of one massive rack, you get four separate units that can be distributed across your garage walls. Each rack holds 330 pounds total across three levels, and the real genius is in the deployment flexibility this offers.
The scratch-resistant construction uses welded joints rather than bolted connections, which eliminates the weak points where cheaper racks often fail. At 12-inch shelf depth, these match the Bora’s capacity for standard lumber widths. What makes this setup work particularly well for garage environments is the ability to stagger rack placement—put two near your workbench for frequently accessed materials, one by the garage door for incoming deliveries, and save the fourth for that awkward corner space that usually goes unused.
This is the rack I recommend to weekend warriors who aren’t storing contractor-length hardwoods but need organized access to project lumber. The 4-pack configuration means you can dedicate one rack to each wood type—pine, plywood, hardwood, and trim—making material selection faster during builds. Installation is straightforward with clear step-by-step instructions, though you’ll need to locate wall studs carefully since there’s no room for error with 330 pounds hanging from your garage wall.
The limitation here is weight capacity per rack. If you’re storing primarily softwoods and plywood, 330 pounds works fine. Start loading up with oak, maple, or cherry, and you’ll hit limits quickly. Customer reviews mention solid performance for typical home workshop usage but note that overloading leads to arm deflection.
Pros:
- Flexible placement across multiple wall areas
- Welded construction eliminates bolted weak points
- Budget-friendly 4-pack reduces per-unit cost
Cons:
- Lower per-rack capacity limits heavy hardwood storage
- Three levels may require more frequent reorganization
The 4-pack typically runs $35-$50, making it one of the most cost-effective wall-mounted options. The value proposition is strong for DIYers who prioritize space efficiency over maximum weight capacity, and the ability to expand by adding more units as your collection grows prevents the “I should have bought bigger” regret.
3. Hymula Horizontal 7-Tier Storage Rack (2,000 lbs Capacity)
When wall-mounting isn’t an option or you’re dealing with serious contractor volumes, the Hymula horizontal rack changes the game entirely. This freestanding unit measures 60 inches wide by 66 inches high by 40 inches deep, and that 2,000-pound capacity isn’t marketing fluff—the heavy-duty steel A-frame construction can genuinely handle a lumber yard’s worth of materials.
The seven adjustable tiers with 8-inch vertical spacing allow custom configuration for everything from 2×4 studs to 12-inch plywood sheets. What separates this from wall-mounted systems is the double-sided access. Load long boards from one side, grab them from the other—perfect for workshops where multiple people need simultaneous material access. The adjustable arms extend from 0 to 12 inches, meaning you can store both standard lumber and those awkward in-between sizes like 10-inch rip cuts or 6-inch trim pieces.
Here’s the real-world consideration: this takes up floor space—40 inches deep by 60 inches wide. If your garage is already cramped, that’s a significant footprint. But for shops where floor space trades off against vertical capacity, the horizontal design actually improves workflow since materials stay organized by type without creating the ladder-climbing hassle of ceiling-mounted systems.
The rack ships with all assembly hardware, and the bolt-together design means you can anchor it to concrete for stability or leave it freestanding if you occasionally need to rearrange your shop layout. Customer feedback highlights the impressive stability even when loaded near capacity, though proper weight distribution across levels remains important to prevent tipping.
Pros:
- Massive 2,000 lb capacity handles professional lumber volumes
- Double-sided access improves multi-user workshop efficiency
- Adjustable arms accommodate non-standard material widths
Cons:
- Significant floor footprint reduces workspace
- Assembly required before first use
Price typically ranges from $180-$250, positioning this as a serious investment for contractors, cabinet makers, or advanced woodworkers running productive shops. The cost-per-pound of capacity beats most wall-mounted alternatives, and the freestanding design avoids the wall-mounting limitations that plague rented workshop spaces.
4. Olgsibb 8-Level Folding Lumber Rack Wall Mount
The Olgsibb folding system addresses a specific garage storage challenge: maximizing vertical space while maintaining load flexibility. Eight levels with 32-inch arm length provide 520 pounds total capacity (130 pounds per level), and the triangular brace design distributes weight more effectively than straight-arm competitors.
The standout feature is the folding mechanism. When not in use, arms fold flat against the wall, creating clearance for vehicles or large equipment. This matters tremendously in dual-purpose garages where lumber storage competes with parking space. The adjustable hole spacing—multiple mounting positions per level—lets you fine-tune shelf heights as your lumber dimensions change between projects.
In testing scenarios with mixed lumber weights, the rack performs admirably with construction-grade softwoods and dimensional lumber. The sturdy latches prevent accidental material spillage, addressing a common safety concern with basic hook-style racks. The powder coating resists rust in humid garage environments where morning dew and temperature swings challenge unprotected steel.
What you’ll notice immediately is installation ease. The welded construction means fewer components to align during mounting, though you absolutely must hit wall studs—eight levels of lumber create substantial lateral force that drywall anchors cannot handle. Customer reviews consistently mention rock-solid performance for softwood and plywood but recommend not pushing the upper weight limits with dense hardwoods stacked multiple boards high per level.
Pros:
- Folding arms reclaim space when storage not needed
- Eight levels maximize vertical garage wall utilization
- Adjustable mounting positions adapt to changing lumber sizes
Cons:
- 32-inch depth may not accommodate extra-wide materials
- Folding mechanism adds minor complexity to loading/unloading
Typical pricing falls between $35-$50, delivering excellent value for the capacity-to-cost ratio. The folding feature alone justifies the slight premium over fixed-arm alternatives for garages where flexibility matters more than raw maximum capacity.
5. YYR 6-Level Heavy Duty Wall Mount (1,200 lbs)
The YYR 6-Level targets the serious woodworker who regularly works with heavy hardwoods and needs confidence in their storage system. At 1,200 pounds total capacity with 200 pounds per level, this rack out-muscles most competitors in the same price bracket.
The enhanced weight capacity comes from thicker steel construction and reinforced welding at stress points. Where cheaper racks use spot welds that eventually fail, the YYR employs continuous welds along critical joints. This engineering matters when you’re storing stacks of walnut, cherry, or maple that individually weigh 50+ pounds per board. The six-level configuration with 12-inch shelf depth matches the Bora’s practical usability while doubling down on structural integrity.
What separates this from budget alternatives is longevity under sustained heavy use. The metal gauge resists bending even when levels are loaded near maximum capacity, and the powder coating applies thicker than typical paint-only finishes, providing genuine rust protection rather than cosmetic coverage. Installation requires locating studs on 16-inch or 24-inch centers for proper support, and the included mounting template simplifies this critical step.
Customer feedback from professional woodworkers emphasizes the peace of mind factor—knowing your expensive hardwood collection won’t come crashing down mid-project matters more than saving $20 on a lighter-duty rack. Some users mount multiple units end-to-end to create continuous runs of 12+ feet for storing long hardwood boards without the center sag common in single-span systems.
Pros:
- 1,200 lb total capacity handles extensive hardwood collections
- Reinforced welding provides superior long-term durability
- Professional-grade construction justifies higher weight ratings
Cons:
- Heavier unit weight requires careful installation planning
- Price premium over basic residential racks
Pricing typically runs $55-$75, positioning this as a premium option that delivers professional performance for serious workshops. The cost-per-pound capacity actually beats many lighter-duty alternatives when you factor in replacement cycles—buying once and mounting securely beats buying twice when the first rack fails.
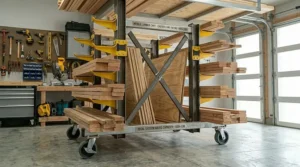
6. DYRABREST Horizontal Storage Rack with Wheels
The DYRABREST mobile rack solves a problem most garage workshops eventually face: static storage doesn’t adapt to changing project needs. This 5-tier rolling rack holds 500 pounds with double-sided access, and the four locking casters transform it from storage solution to material handling cart.
The double-sided design allows strategic positioning in workshop centers where materials can be accessed from either direction. Load sheet goods on one side, dimensional lumber on the other, and roll the entire rack to your work area when starting projects. The locking mechanism on all four wheels provides stability during loading and unloading—critical for preventing the “shopping cart effect” where the rack rolls away as you try to place heavy boards.
The safety hooks on each arm prevent materials from sliding off during movement, addressing the biggest concern with mobile storage. The angled hook design creates positive retention without making board removal awkward, and the protective end caps prevent sharp edges from damaging stored materials. Assembly requires basic tools and takes roughly an hour with the included instructions.
Real-world usage shows this excels in shops where project types vary significantly. Furniture builder today, deck framer tomorrow? Roll material selection to match. The mobility means you can temporarily relocate the rack outside during glue-up operations or large assembly work, then bring it back inside for secure storage. Customer feedback highlights the convenience factor while noting that the 500-pound capacity requires thoughtful loading—heavy materials should stay on lower tiers for stability.
Pros:
- Mobility adapts storage to changing project needs
- Double-sided access improves workflow efficiency
- Locking casters provide stability during loading
Cons:
- 500 lb capacity limits versus fixed-position racks
- Floor space requirements similar to freestanding units
Price ranges from $140-$190, reflecting the added engineering of mobile functionality. The premium over wall-mounted alternatives pays off for flexible workshops where material positioning impacts productivity more than maximum capacity. Consider this the difference between static storage and dynamic workflow optimization.
7. Yociyoga 6-Tier Detachable Wood Organizer
The Yociyoga detachable system takes modularity to a new level: six rack sections that install independently rather than as a single unit. Each section holds 100 pounds, combining for 600 pounds total capacity, and the detachable design allows unusual configurations that fixed-span racks can’t match.
The key advantage is installation flexibility. Got an L-shaped wall? Install sections around the corner. Awkward garage columns interrupting your wall? Mount sections between obstructions. The detachable design also means you can start with three sections, then add more as your lumber collection expands without removing and reinstalling everything. Each section mounts independently, so replacing a damaged unit or relocating storage as your workshop evolves doesn’t require complete system teardown.
The adjustable height holes—standard on each section—allow shelf spacing customization per section. Store short cutoffs on tightly-spaced lower sections while using wider spacing for long boards up top. This granular control beats one-size-fits-all approaches for workshops managing diverse material types. The scratch-resistant steel construction includes pre-drilled mounting holes that align with standard 16-inch stud spacing, simplifying installation planning.
Where this shines is in non-standard garage layouts where conventional racks don’t fit naturally. Customer reviews from workshop owners with unusual wall configurations praise the adaptability, though some note that buying sections individually costs more than packaged multi-rack systems. The trade-off between modular flexibility and bulk pricing becomes your decision based on specific space constraints.
Pros:
- Detachable sections adapt to unusual wall configurations
- Expandable system grows with lumber collection
- Independent section mounting simplifies installation
Cons:
- Per-section purchasing can exceed packaged rack costs
- 100 lb per section requires careful heavy wood distribution
Pricing falls between $45-$65 depending on how many sections you purchase initially. The modular approach costs slightly more than comparable fixed systems but pays dividends in flexibility for garages where standard mounting solutions don’t work. Think of this as the custom-tailored option versus off-the-rack alternatives.
How to Choose the Right Lumber Storage Rack for Your Garage
Selecting a lumber storage rack for garage spaces goes beyond browsing Amazon’s top sellers. The right choice depends on matching rack capabilities to your specific workshop environment, material types, and usage patterns. Let me walk you through the decision framework that professional woodworkers use.
Assess Your Weight Requirements Accurately
Most people drastically underestimate lumber weight. A single 8-foot 2×12 pressure-treated pine board weighs roughly 40 pounds. Stack ten of those? You’re at 400 pounds on a single rack level. Hardwoods amplify this—a 6-foot piece of 8/4 cherry weighs 25-30 pounds. Your rack selection must account for realistic loaded weight, not optimistic “maybe I’ll only store a few boards” estimates.
The calculation gets more complex when factoring wood moisture. Freshly milled lumber weighs significantly more than kiln-dried stock. If you’re storing green lumber for air drying, add 30-40% to your weight calculations. This is where racks with per-level ratings matter more than total capacity—distributing heavy materials across multiple levels prevents concentrated stress that causes arm sag or mounting failures.
Match Storage Style to Your Space Constraints
Wall-mounted racks work brilliantly until you run out of accessible wall space. Measure your available wall runs carefully, accounting for doors, windows, electrical panels, and garage door tracks that eliminate mounting options. Most wall-mounted systems need 16-inch stud spacing for secure installation—if your garage has metal studs or unusual framing, freestanding racks may be your only viable option.
Ceiling height matters more than you’d think. Standard 8-foot garage ceilings limit vertical rack configurations since you need clearance for loading and unloading overhead levels. If you can’t comfortably reach the top shelf without a step stool, you’ll eventually stop using it, creating wasted capacity. Horizontal freestanding racks better utilize low-ceiling spaces by keeping material access at waist-to-shoulder height.
Consider Your Material Variety
Storing only construction-grade dimensional lumber? Simple 3-level racks with wide spacing work perfectly. Managing a mix of hardwoods, plywood, trim, and molding? You need adjustable spacing to prevent wasted rack capacity. The difference between fixed-spacing and adjustable systems becomes apparent after your first project that leaves oddly-sized cutoffs—if they don’t fit your storage configuration, they end up in that floor pile you were trying to eliminate.
Think about material length too. Most residential garage racks handle 8-foot boards comfortably, but storing 10-foot or 12-foot lengths requires either end-to-end rack mounting or horizontal systems that accommodate extended materials. Contractors often overlook this until they buy 16-foot pine boards for deck framing and realize their 72-inch rack doesn’t cut it.
Factor in Installation Complexity
Wall-mounted systems require stud-finding accuracy and confidence with power drills. Missed studs or installations into just drywall create dangerous failure points. If your DIY skills lean more toward woodworking than carpentry, freestanding horizontal racks eliminate mounting anxiety. The assembly-required aspect also matters—some units arrive as fabricated sections needing only bolt-together assembly, while others require measuring, cutting, and fitting during installation.
The permanent-versus-temporary consideration matters for renters or workshop owners who might relocate. Wall-mounted racks leave holes requiring patching and paint. Freestanding systems move with you but sacrifice vertical space efficiency. Mobile racks split the difference, providing portability without permanent wall modifications.
Calculate Your True Budget Including Installation
That $40 rack becomes $75 after buying appropriate lag bolts, washers, and mounting hardware that isn’t included. Professional installation—if you’re not comfortable with structural mounting—adds another $100-200 to the total. Freestanding racks include all hardware but may require assembly tools you don’t own. Factor the complete implementation cost, not just the rack price.
The durability equation matters for long-term value. Cheap racks that sag or fail after two years effectively cost more than premium units lasting ten years. When comparing options, divide the total cost by expected service life to calculate annual ownership cost. That $180 Hymula rack working flawlessly for a decade costs $18 per year, while the $40 rack requiring replacement every two years actually costs $20 annually.
Setting Up Your Lumber Storage Rack: Installation Tips That Matter
Mounting a lumber storage rack for garage walls sounds straightforward until you’re standing there with a drill, wondering if you’ve located studs correctly. Having installed dozens of these systems, I’ve learned which steps prevent the most common failures.
Stud Location Is Non-Negotiable
Electronic stud finders miss sometimes. The reliable method combines three checks: electronic finder, magnet (finds drywall screws marking studs), and the knock test (solid sound indicates stud, hollow indicates cavity). Mark stud locations with painter’s tape that won’t damage paint. For critical installations supporting 600+ pounds, drill pilot holes to verify stud presence before committing to full mounting.
Standard residential framing uses 16-inch on-center spacing, but renovations, fire blocking, and unusual construction can disrupt this pattern. Never assume—always verify. If your garage has metal studs, specific hardware rated for metal stud mounting becomes necessary. Standard wood-rated lag bolts won’t provide adequate holding strength in metal framing.
Use Appropriate Mounting Hardware
Most rack systems include basic hardware, but upgrading to structural-grade lag screws provides additional safety margin. For heavy-duty installations (1,000+ pound capacity), 3/8-inch diameter lag screws penetrating at least 2 inches into studs create proper connection. Washers distribute load across larger surface area, preventing pull-through failures.
The critical dimension is penetration depth—measure your drywall thickness (usually 1/2 or 5/8 inch) and add 2.5 inches to calculate minimum lag screw length. Too-short screws strip out under load. Too-long screws risk hitting electrical wiring or plumbing within walls. When in doubt, consult local building codes or hire professional installation.
Level Installation Prevents Long-Term Problems
Racks installed even slightly off-level create gradual material sliding. Over time, boards migrate to the lower end, creating uneven weight distribution and potential tipping hazards. Use a 4-foot level during installation, and check level across multiple mounting points. For racks spanning 6+ feet, laser levels provide accuracy across the entire installation span.
The consequences of off-level installation compound over time. What starts as minor material shifting eventually creates noticeable sag in one section as weight concentrates unevenly. Correcting this requires complete removal and reinstallation—proper leveling the first time prevents this hassle.
Strategic Spacing Maximizes Usability
Vertical spacing between levels should match your most common lumber dimensions with 2-3 inches clearance. Storing primarily 2×4 and 2×6 stock? Space levels 4-6 inches apart. Working with 2×10 and 2×12 materials? Use 12-14 inch spacing. The goal is preventing wasted space while maintaining easy board removal without lifting over adjacent levels.
Consider workflow patterns too. Place frequently accessed materials at waist height to minimize bending and overhead reaching. Reserve bottom levels for heavy hardwoods, middle levels for daily-use dimensional lumber, and top levels for specialty materials accessed occasionally. This vertical organization mirrors the restaurant kitchen principle: highest-use items in the “golden zone” between waist and shoulder height.
Load Distribution Requires Thought
Even racks with impressive weight ratings perform best when loads distribute evenly. Placing all your heavy materials on one level while leaving others empty creates stress concentration. Balance heavy and light materials across the system. If one level must carry particularly heavy loads, position it lower in the rack where structural support is strongest.
The loading sequence also matters. Start with the heaviest, longest materials on bottom levels, working progressively lighter and shorter toward the top. This creates a stable weight pyramid that resists tipping and reduces stress on upper mounting points. Never fully load upper levels before adding weight to lower ones—this inverts the weight distribution and increases mounting stress.
Wood Storage Best Practices: Protecting Your Lumber Investment
Buying the perfect lumber storage rack for garage installation is only half the battle. How you actually store wood determines whether boards stay flat and true or warp into expensive kindling. The difference between professional results and amateur frustration often comes down to storage technique.
Horizontal Storage Beats Vertical for Most Applications
Physics doesn’t negotiate: boards stored vertically flex under their own weight, creating gradual bowing that becomes permanent. Horizontal storage distributes weight across the board’s width rather than concentrating stress at the base. This is especially critical for softwoods like pine and fir, which deform more easily than dense hardwoods.
The exception is short pieces under 4 feet—these can store vertically without significant bowing risk. But anything longer should stay horizontal. Even plywood sheets, which seem stiff enough for vertical storage, develop edge bowing when stood upright for extended periods. The cost savings from buying straight lumber evaporates quickly if poor storage creates twist and bow before you cut the first joint.
Air Circulation Prevents Moisture Problems
Wood constantly exchanges moisture with surrounding air. Proper storage allows airflow around all board surfaces, preventing localized humidity that causes mold, staining, and uneven moisture content. Never stack boards directly against each other—use spacers (called “stickers” in woodworking) between layers to maintain air gaps.
The garage environment complicates this since temperature and humidity fluctuate with seasons. Concrete floors wick moisture upward, which is why proper racks keep lumber elevated 8-12 inches minimum. In humid climates, consider adding a dehumidifier to your workshop space. Wood reacts to its environment, so keeping temperature, humidity, and airflow equal on both sides of a board is important to prevent warping.
Support Lumber at Proper Intervals
Long boards need intermediate support to prevent sagging. According to OSHA material storage guidelines, lumber should be stacked on level and solidly supported sills, and lumber must be stacked so it is stable and self-supporting. For 8-foot boards, supports at both ends and center work adequately. For 12-foot or longer materials, supports every 4 feet prevent the gradual sag that accumulates over time.
The support point matters too. Narrow boards (under 6 inches wide) need more frequent support than wide stock. Think of it as bridge engineering—wider pieces distribute weight more effectively than narrow ones. This is why dimensional lumber can span longer distances between supports than narrow trim or molding.
Organize by Species and Project
Random lumber stacking creates workflow problems and risks damage. Group similar species together—all the pine here, hardwoods there, plywood on its own rack. This organization speeds project setup since you’re not digging through mixed piles searching for that one piece of cherry.
Taking this further, some woodworkers organize by project rather than species. Active project materials stay at eye level for easy access. Future project stock goes higher up. Scrap worth keeping but without immediate purpose occupies lower levels. This three-tier system matches storage location to material importance.
Regular Inspection Catches Problems Early
Schedule quarterly storage inspections, checking for material degradation, rack integrity, and organizational drift. Look for insect damage (especially in softwoods), mold or staining from moisture, and warping from improper support. Address problems immediately—one moldy board can contaminate adjacent stock, and rack damage worsens under continued load.
Check mounting hardware during inspections too. Lag screws can work loose over time as wood dimensional lumber swells and contracts with humidity. Retighten as needed, and watch for rust on metal components indicating moisture problems requiring environmental correction.
Common Mistakes When Storing Lumber (And How to Avoid Them)
Even experienced woodworkers sometimes default to suboptimal storage habits. Understanding these common pitfalls helps you sidestep expensive mistakes before they happen.
Leaning Boards Against Walls Seems Convenient Until It Isn’t
That quick lean-the-2×4-against-the-wall approach works for a day or two, but becomes a problem when “temporary” storage becomes permanent. When you lean a board against a wall, you expose each side to different temperatures, humidity, and air flows, which causes warping. The wall-side stays cooler and retains more moisture while the exposed side dries faster, creating uneven moisture content that bows the board.
Multiply this across dozens of boards and you’ve created a domino-waiting-to-happen hazard. One board shifts, others follow, and suddenly you’re picking up 20 scattered boards while hoping none landed on your table saw. Invest in proper racks from the start rather than fighting recurring organization battles.
Underestimating Weight Capacity Leads to Dangerous Failures
That 330-pound rack rating assumes even weight distribution across all levels. Loading 200 pounds on one shelf while leaving others empty exceeds the design specs for that concentrated load point. The rack might hold initially, but stress accumulates until a catastrophic failure dumps everything onto the floor—or worse, onto anyone nearby.
Always check per-level ratings, not just total capacity. A 600-pound total rack with three levels theoretically holds 200 pounds per shelf, but the manufacturer may rate individual levels lower depending on mounting design. Read specifications carefully and err on the side of underloading rather than testing limits.
Storing Wood Directly on Concrete Floors
Concrete appears solid and moisture-resistant, but it actually wicks humidity from ground contact. Lumber sitting directly on garage floors absorbs moisture from below, creating bottom-side swelling while tops stay drier. This moisture gradient causes cupping—the board edges curl upward—that’s difficult or impossible to correct.
Even short-term floor storage causes problems. Wood picks up concrete dust that embeds in grain, dulling cutting tools prematurely. Concrete’s rough surface also scratches and dents boards, creating cosmetic defects that show in finished projects. Keeping everything elevated on proper racks eliminates these issues completely.
Neglecting to Sort and Rotate Stock
Last-in-first-out storage means older lumber sits indefinitely while you use fresh purchases. Old boards develop age-related problems: checking (surface cracks), increased brittleness, and moisture content mismatches compared to newer stock. Rotating inventory—using oldest boards first—prevents waste from lumber degradation.
The sorting aspect matters for project efficiency. Mixing random lengths, widths, and species creates decision paralysis when starting projects. Spending five minutes organizing after each lumber purchase saves hours of sorting later. Consider it preventive maintenance for your workflow rather than busywork.
Ignoring Environmental Factors
Garages experience dramatic temperature swings—below freezing in winter, over 100°F in summer in some climates. These extremes cause wood to expand and contract, potentially creating permanent dimensional changes if moisture content varies during temperature swings. While you can’t climate-control most garages, understanding these factors helps you time projects appropriately.
Letting lumber acclimate to shop conditions before cutting and joining prevents the frustrating experience of building a perfectly fit project that falls apart six months later when wood stabilizes at different dimensions. The general rule: allow lumber to sit in your shop for a few weeks before milling to final dimensions, letting it reach equilibrium with the working environment.
Lumber Storage Rack for Garage vs. DIY Solutions: Making the Smart Choice
The temptation to build your own lumber rack from 2x4s and pipe brackets is strong, especially for woodworkers who default to “I can build that cheaper.” Sometimes that instinct serves you well. Sometimes it costs more in the long run. Let’s break down when each approach makes sense.
Cost Analysis Beyond Material Prices
A DIY lumber rack using construction-grade 2x4s and conduit might cost $30-40 in materials. The catch is time investment—designing, cutting, assembling, and mounting a sturdy rack takes 4-6 hours for most DIYers. Value your time at even a modest $25/hour and you’re at $100-150 in opportunity cost plus materials. Commercial racks in the $40-60 range with proven designs start looking competitive.
The longevity equation tips scales further toward commercial options. DIY racks using construction lumber and basic pipe brackets lack the engineering optimization of manufactured alternatives. Arm sag develops faster. Joints loosen more readily. That cheap build might need rebuilding in 3-5 years while commercial racks provide decade-plus service life. Factor replacement cycles into true cost comparisons.
Engineering Advantages of Commercial Designs
Manufactured racks benefit from engineering that considers load distribution, stress concentration, and failure mode analysis. Those triangular braces on quality racks aren’t decorative—they’re structural elements that prevent gradual arm sag under sustained loads. The welded joints distribute stress more evenly than bolted connections that can loosen over time.
Powder coating provides rust protection that paint-only DIY finishes struggle to match. In humid garage environments where temperature swings create condensation, proper corrosion resistance extends service life significantly. Bare steel DIY racks start rusting within months in coastal or humid climates, eventually requiring replacement when structural integrity compromises.
When DIY Makes Sense
If you’re storing light materials occasionally—trim pieces, molding, and lightweight stock under 50 pounds per level—simple DIY solutions work adequately. The engineering requirements decrease when loads stay low. Building custom-sized racks to fit unusual garage dimensions also favors DIY since commercial options may not offer the exact configuration needed.
The learning experience matters too if you’re building skills for future projects. Designing and constructing a lumber rack teaches joinery, load calculation, and structural thinking that applies to furniture building and other woodworking. The educational value justifies building DIY even when commercial options cost less.
Safety Considerations Favor Proven Designs
Commercial racks carry weight ratings based on testing—manufacturers face liability if ratings prove inaccurate. Your DIY rack has no such validation. Guessing at capacity means risking catastrophic failure if you exceed structural limits unknowingly. For heavy material storage above 300-400 pounds, commercial racks with documented capacity provide peace of mind worth the premium.
Installation complexity also matters. Commercial racks include mounting templates and instructions refined through thousands of customer installations. DIY builds require you to engineer the mounting strategy yourself, risking mistakes that create failure points. If you’re not confident calculating shear strength and pull-out resistance for lag bolt installations, stick with proven commercial designs.
Maximizing Garage Space: Integration Strategies Beyond Just Racks
Installing a lumber storage rack for garage walls solves wood organization, but comprehensive garage optimization requires thinking beyond single-purpose solutions. Smart integration multiplies storage efficiency.
Vertical Layering Creates Multi-Function Storage
Wall-mounted lumber racks occupy the 3-5 foot height band on walls. That leaves floor space below and upper wall space above available for complementary storage solutions. Mount lumber racks at 30-40 inches off the floor, then use rolling tool chests or workbenches underneath. The vertical separation prevents interference while maximizing wall utility.
Above lumber racks, mount ceiling-mounted shelving for lightweight materials—foam insulation, large cardboard, and other items needing storage but rarely accessed. This three-tier approach—floor-level tools, mid-level lumber, upper storage—extracts maximum value from limited garage real estate. Just maintain clearance for overhead garage door operation if applicable.
Strategic Placement Considers Workflow
Position lumber storage near your cutting station to minimize material transport. Carrying 12-foot boards across the garage wastes time and creates collision hazards with equipment. The optimal layout places lumber racks within 5-10 feet of your table saw or miter saw station, creating efficient material-to-cutting-to-work flow.
Consider door locations too. If you buy lumber from retail stores, you’re unloading through your garage door. Placing lumber storage near the door minimizes carrying distance for incoming materials. This seemingly minor detail matters when you’re manhandling heavy hardwood boards solo—every foot of reduced carrying distance helps.
Mobile Elements Add Flexibility
While permanent wall-mounted racks provide high-capacity storage, adding a mobile cart for active project materials improves workflow dramatically. Load current project lumber on the rolling cart, then wheel it to various work stations as needed. This keeps materials organized and accessible without repeatedly walking to permanent storage.
The hybrid approach—permanent racks for long-term storage, mobile cart for active projects—delivers both capacity and convenience. As projects complete, return materials to permanent storage and reload the mobile cart for the next build. This system prevents the common garage problem where in-progress project materials scatter across available surfaces.
Overhead Storage Complements Wall Racks
Garage ceilings offer storage real estate that wall racks can’t access. Overhead storage systems work perfectly for sheet goods—plywood, MDF, and hardboard sheets store flat overhead, leaving wall racks for dimensional lumber. The separation by material type simplifies organization since you’re not mixing incompatible storage needs.
Safety matters with overhead storage. Never exceed weight ratings, and ensure installations anchor into ceiling joists rather than just drywall. Storage racks must be installed securely and designed to prevent materials from falling, with proper consideration for weight limits and stability. Professional installation provides peace of mind if you’re uncertain about ceiling-mounting structural requirements.
Maintenance and Long-Term Care for Your Lumber Storage System
Installing a lumber storage rack for garage organization isn’t set-and-forget. Regular maintenance extends system life and prevents the gradual degradation that leads to expensive failures.
Quarterly Inspection Prevents Catastrophic Failures
Schedule quarterly walkarounds inspecting every aspect of your storage system. Check mounting hardware for loosening—temperature cycles cause expansion and contraction that can gradually unthread lag screws. Tighten any loose hardware immediately, and look for rust indicating moisture problems requiring correction.
Examine rack arms for sag or deflection. Slight bowing under load is normal, but progressive worsening indicates overstressed components approaching failure. Redistribute weight or upgrade to higher-capacity racks before problems escalate. Detecting early warning signs costs less than dealing with collapsed storage.
Rust and Corrosion Management
Even powder-coated racks develop rust over time, especially in humid garage environments. Catching rust early allows simple remediation—wire brush the affected area, apply rust converter, then touch up with matching spray paint. Ignored rust spreads, eventually compromising structural integrity.
For racks in consistently humid environments, consider applying paste wax to metal surfaces annually. The protective coating repels moisture while not interfering with rack function. This preventive measure costs pennies but extends rack life significantly in challenging conditions.
Periodic Reorganization Maintains Efficiency
Your lumber collection evolves—materials used up, new stock acquired, project priorities changing. Schedule annual reorganization sessions where you completely audit stored materials, dispose of unusable scraps, and reconfigure rack organization to match current needs. This prevents the gradual chaos that develops when you keep adding materials without culling and restructuring.
The reorganization process also reveals problems. Wood developing mold gets identified and removed before contaminating adjacent stock. Damaged boards that slipped past initial inspection get culled before wastefully occupying storage space. Think of it as inventory management for your shop’s raw materials.
Load Balancing As Collections Grow
Most woodworkers accumulate materials over time—the lumber collection that started with basic pine eventually includes hardwoods, plywood, and specialty species. Periodically reassess load distribution to prevent overloading individual rack levels or sections. What worked when you stored 200 pounds of pine doesn’t work when you’re at 500 pounds mixing hardwoods and softwoods.
Consider upgrading storage before reaching capacity limits. Operating at 80-90% of rated capacity provides safety margin for occasional overloading and prevents stress accumulation that shortens rack life. If you’re consistently running near limits, it’s time to expand storage rather than push existing systems beyond design parameters.
Frequently Asked Questions About Lumber Storage Racks
❓ How much weight can a typical lumber storage rack for garage hold?
❓ What is the best way to store lumber in a small garage?
❓ Should lumber be stored horizontally or vertically in garage?
❓ How far apart should lumber rack supports be?
❓ Can I mount a lumber storage rack on drywall without studs?
Conclusion: Transform Your Garage with Proper Lumber Storage
The difference between a cluttered workshop and a professional-grade workspace often comes down to one decision: proper lumber storage. When materials stay organized, flat, and accessible, projects flow smoothly. When wood warps from poor storage or you waste 20 minutes searching for that one specific board, frustration builds and productivity plummets.
Choosing the right lumber storage rack for garage installation means matching system capabilities to your specific needs—weight capacity for your material types, configuration for your available space, and durability for your usage intensity. The Bora PBR-001 delivers professional flexibility for serious woodworkers, while the Ultrawall 4-pack offers budget-friendly efficiency for weekend warriors. Contractors managing heavy volumes should consider the Hymula horizontal rack’s 2,000-pound capacity, and flexible workshops benefit from the DYRABREST mobile system.
Beyond product selection, remember that installation quality matters as much as rack choice. Proper stud mounting, level installation, and thoughtful load distribution prevent the failures that turn storage solutions into safety hazards. Regular maintenance—quarterly inspections, rust management, and periodic reorganization—extends system life and maintains performance over years of service.
The investment in quality lumber storage pays dividends immediately: reclaimed floor space, protected wood integrity, and workflow efficiency that turns project ideas into finished builds faster. That tangled pile of lumber leaning against your garage wall represents both wasted space and wasted materials. Proper storage transforms chaos into capability.
Start by assessing your current lumber collection and available wall space. Measure carefully, calculate realistic weight requirements, and select a system that accommodates future growth rather than just current needs. Your workshop—and your projects—will thank you every time you reach for perfectly flat, organized materials instead of digging through a disorganized pile.
✨ Don’t Miss These Exclusive Deals!
🔍 Take your workshop organization to the next level with these carefully selected lumber storage racks. Click on any highlighted product to check current pricing and availability. These systems will help you create an authentic professional workspace your projects deserve!
Recommended For You
- 7 Genius Resistance Band Storage Ideas That Transform Your Gym (2026)
- 7 Best Kettlebell Storage Rack Options to Organize Your Home Gym 2026
- 7 Best Barbell Holder Wall Mount Systems (2026 Guide)
Disclaimer: This article contains affiliate links. As an Amazon Associate, I earn from qualifying purchases. If you purchase products through these links, we may earn a small commission at no additional cost to you.
✨ Found this helpful? Share it with your friends! 💬🤗