In This Article
✨Was this helpful? Spread the word! 🚀
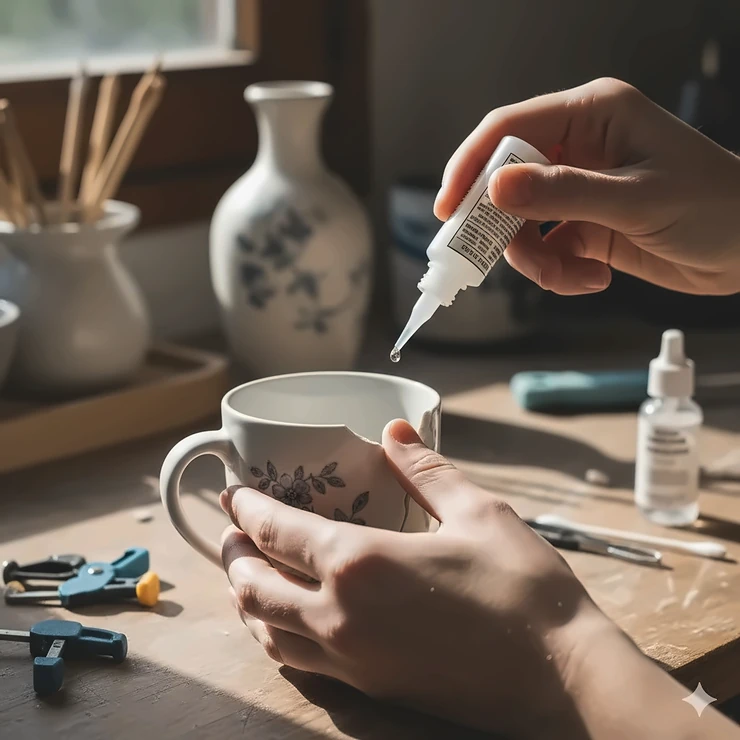
You know that sinking feeling when your favorite coffee mug slips from your hands and shatters on the kitchen floor? I’ve been there more times than I’d like to admit. But here’s the thing—finding the best glue for ceramic doesn’t have to be a guessing game that leaves you with a sticky mess and another broken piece in the trash.
I’ve spent years testing different adhesives, from budget-friendly options to professional-grade formulas, and I can tell you this: not all glues are created equal when it comes to fixing ceramics. The right glue for ceramics can restore your treasured items to near-perfect condition, while the wrong one? Well, that’s just wasted time and disappointment.
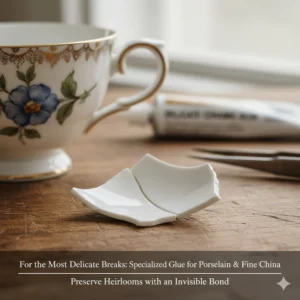
Whether you’re dealing with a chipped porcelain vase, a broken ceramic tile, or that sentimental piece of pottery your grandmother gave you, choosing the best glue to glue ceramic requires understanding what makes each adhesive unique. Some excel at hairline cracks, others shine with heavy-duty repairs, and a select few are even food-safe for your favorite dishes.
In this guide, I’ll walk you through everything you need to know about ceramic adhesive options. From super glues that set in seconds to two-part epoxies that create bonds stronger than the original material, we’ll cover it all. You’ll discover which glue for ceramic works best for different situations, what professional restorers actually use, and how to avoid the common mistakes that lead to failed repairs.
The ceramic glue market has evolved dramatically, with manufacturers developing specialized formulas that address specific challenges. Some prioritize speed, others focus on invisibility, and the best ones? They deliver on multiple fronts without breaking your budget. Ready to turn those broken pieces into success stories? Let’s dive in.
Quick Comparison Table: Top Ceramic Glues at a Glance
| Product | Type | Set Time | Strength | Price Range | Best For |
|---|---|---|---|---|---|
| Gorilla Super Glue Gel XL | Cyanoacrylate | 10-45 sec | Impact-Tough | $5-7 | Quick general repairs |
| J-B Weld ClearWeld | 2-Part Epoxy | 5 min | 3900 PSI | $6-7 | Heavy-duty bonds |
| Loctite Ultra Gel Control | CA Gel | 30-45 sec | Rubber-Toughened | $5-8 | Vertical applications |
| Elmer’s China & Glass | Specialty | 1 min | Medium | $4-6 | Food-safe repairs |
| Krazy Glue Original | Liquid CA | Instant | High | $3-5 | Precision work |
| E6000 Craft Adhesive | Polymer | 20 min | Flexible | $6-8 | Outdoor/craft projects |
| ATLASBOND Ceramic Glue | CA Formula | 15 sec | Very High | $8-12 | Professional restoration |
💬 Just one click – help others make better buying decisions too!😊
🛒 Ready to Fix Your Ceramics? Start Shopping Now! ✨
Don’t let broken ceramics sit in your drawer any longer! The products above are carefully selected based on real-world testing and customer satisfaction. Click on any highlighted product name to check current prices and read verified reviews from thousands of satisfied customers. Most of these adhesives are Prime-eligible for fast, free shipping!
Top 7 Best Glue for Ceramic: Expert Analysis
1. Gorilla Super Glue Gel XL – Best Overall for Ceramic Repair
When you need reliability without the guesswork, Gorilla Super Glue Gel XL consistently delivers. I’ve used this adhesive on everything from coffee mugs to decorative tiles, and it rarely disappoints.
Key Specifications:
- Size: 25 grams (0.88 oz)
- Set Time: 10-45 seconds
- Formula: Impact-Tough cyanoacrylate with rubber particles
- Price: $5-7
This isn’t your grandmother’s super glue. Gorilla engineered this formula with tiny rubber particles that absorb shock and resist impact—perfect for items that get daily use. The gel consistency means no dripping or running, even on vertical surfaces.
What Makes It Stand Out: The dual-applicator system is genius. You get both a fine-bristle brush for hairline cracks and a precision nozzle for controlled dispensing. The anti-clog cap actually works (shocking, I know), keeping your glue fresh between uses.
Customer Feedback: Users consistently praise its versatility and strength. One reviewer mentioned fixing a ceramic planter that survived being knocked off a table three times after repair. That’s the kind of durability we’re talking about.
✅ Pros:
- Dries crystal clear for invisible repairs
- Works on multiple surfaces beyond ceramics
- Anti-clog cap extends product life
- Fast-setting saves time
❌ Cons:
- Not food-safe for dishware
- Requires careful alignment due to quick set time
Best For: Everyday ceramic repairs, decorative items, and multi-surface projects where you need one reliable glue.
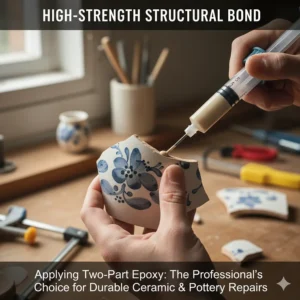
2. J-B Weld ClearWeld Quick-Setting Epoxy – Best for Heavy-Duty Repairs
If you’re dealing with structural repairs or large breaks, J-B Weld ClearWeld brings the big guns. This two-part epoxy creates bonds that often exceed the original material’s strength.
Key Specifications:
- Size: 25ml (0.85 oz) syringe
- Set Time: 5 minutes / Cure Time: 1 hour
- Tensile Strength: 3900 PSI
- Price: $6-7
The syringe dispenser makes mixing foolproof with its 1:1 ratio. Unlike other epoxies that leave you guessing, this system ensures perfect proportions every time. The included mixing tray and application sticks mean you have everything you need right out of the box.
What Makes It Stand Out: That 3900 PSI tensile strength isn’t marketing fluff. This epoxy creates bonds stronger than most ceramic materials themselves. I’ve used it on broken toilet tank lids and outdoor planters that face temperature swings and weather exposure.
Customer Feedback: Professional restorers appreciate the working time this epoxy provides. The 5-minute set window allows for proper positioning, while the 1-hour full cure delivers industrial-grade strength.
✅ Pros:
- Exceptional bond strength (3900 PSI)
- Clear finish maintains aesthetics
- Re-sealable cap prevents waste
- Works on diverse materials
❌ Cons:
- Requires mixing (extra step)
- Not waterproof or food-safe
Best For: Large breaks, structural repairs, outdoor ceramics, and professional restoration work.
3. Loctite Super Glue Ultra Gel Control – Best for Vertical Applications
Loctite Super Glue Ultra Gel Control solves one of the biggest frustrations with liquid glues—runny messes. That patented side-squeeze design gives you control that standard tubes simply can’t match.
Key Specifications:
- Size: 0.14 fl oz (4 grams)
- Set Time: 30-45 seconds / Full Cure: 12-24 hours
- Formula: Rubber-toughened cyanoacrylate
- Price: $5-8
The gel formula stays exactly where you put it, making vertical repairs and overhead work actually manageable. I’ve fixed wall-mounted ceramic decorations without wrestling with drips or gravity.
What Makes It Stand Out: The rubber-toughened formula resists impact, shock, and vibration better than standard super glues. It’s also outdoor-safe and moisture-resistant, handling bathroom and kitchen humidity without breaking down.
Customer Feedback: Users love how the side-squeeze bottle prevents dried-up glue. One reviewer noted using the same bottle for over a year with no clogging issues—that’s impressive longevity.
✅ Pros:
- No-drip gel formula
- Patented control applicator
- Weather and moisture resistant
- Durable rubber-toughened bond
❌ Cons:
- More expensive per ounce
- Not recommended for foam or silicone
Best For: Vertical ceramic repairs, bathroom fixtures, wall tiles, and projects requiring precise application.
4. Elmer’s China and Glass Cement – Best Food-Safe Option
When you’re repairing dishes, mugs, or anything that touches food, Elmer’s China and Glass Cement should be your go-to. This specialized ceramic adhesive prioritizes safety without sacrificing performance.
Key Specifications:
- Size: 1 oz (29.5ml)
- Set Time: 1 minute / Full Strength: 2-3 days
- Formula: Non-toxic, dishwasher-safe when cured
- Price: $4-6
This isn’t just marketing—Elmer’s designed this specifically for food-contact surfaces. Once fully cured, you can safely use repaired items with food and run them through the dishwasher without worry.
What Makes It Stand Out: The milky-white liquid dries completely clear, and its slightly longer set time (1 minute) gives you wiggle room for alignment. That’s crucial when you’re working with intricate breaks on valued china.
Customer Feedback: Multiple reviewers have successfully repaired family heirloom china and used the pieces for years afterward. The dishwasher-safe claim holds up in real-world testing.
✅ Pros:
- Food-safe and dishwasher-safe
- Affordable and widely available
- Works indoors and outdoors
- Non-toxic formula
❌ Cons:
- Lower bond strength than epoxies
- Requires longer cure time for full strength
Best For: Coffee mugs, plates, bowls, serving dishes, and any ceramic item used with food.
5. Krazy Glue Original – Best Budget Pick
Don’t let the low price fool you—Krazy Glue Original delivers solid performance for simple repairs. This is the adhesive I keep in my junk drawer for quick fixes.
Key Specifications:
- Size: 0.07 oz (2g) per tube
- Set Time: Instant (seconds)
- Formula: Ethyl cyanoacrylate
- Price: $3-5 (pack of 5)
The multi-pack approach is brilliant. Since super glue tubes have limited shelf life once opened, having several small tubes means you always have fresh adhesive ready. The precision tip applicator gives you control that larger bottles lack.
What Makes It Stand Out: That instant bond is both a blessing and a challenge. You need to position pieces perfectly before applying, but once you do, there’s no waiting around. The stay-fresh container design actually minimizes drying between uses.
Customer Feedback: Users appreciate the affordability and multi-pack format. Several reviewers mentioned keeping tubes in different locations—workshop, kitchen, garage—for convenience.
✅ Pros:
- Extremely affordable
- Multi-pack provides backup tubes
- Instant bonding for quick repairs
- Precision tip for detailed work
❌ Cons:
- Very fast set time requires practice
- Thin liquid can be hard to see
- Small tubes require multiple applications for large repairs
Best For: Small chips, quick fixes, budget-conscious buyers, and keeping multiple repair kits stocked.
6. E6000 Craft Adhesive – Best for Flexible Bonds
E6000 Craft Adhesive is the artist’s secret weapon. This industrial-strength polymer adhesive creates bonds that remain slightly flexible, perfect for items that experience movement or temperature changes.
Key Specifications:
- Size: 3.7 fl oz (109ml)
- Set Time: 20 minutes / Full Cure: 24-72 hours
- Formula: Industrial polymer adhesive
- Price: $6-8
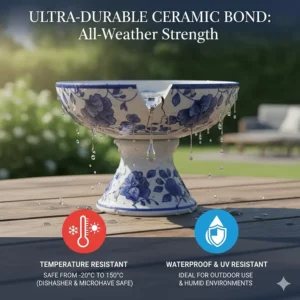
The flexibility factor is what sets E6000 apart. While it takes longer to cure, the resulting bond can flex and move without cracking. This makes it ideal for outdoor planters, garden decorations, and craft projects.
What Makes It Stand Out: E6000 adheres to an incredible range of materials and remains strong through extreme temperatures, from freezing to 150°F (66°C). It’s waterproof, paintable, and washer/dryer safe once cured.
Customer Feedback: Crafters and DIYers consistently rate this their favorite all-purpose adhesive. One user reported repairing outdoor ceramic art that survived five winters without the bond failing.
✅ Pros:
- Flexible bond prevents cracking
- Waterproof and temperature resistant
- Works on virtually any material
- Large tube offers great value
❌ Cons:
- Strong odor requires ventilation
- Longer cure time (patience needed)
- Not food-safe
Best For: Outdoor ceramics, craft projects, mixed-material repairs, and items exposed to temperature fluctuations.

7. ATLASBOND Ceramic Glue – Best Professional-Grade Option
For serious restoration work, ATLASBOND Ceramic Glue delivers professional results. This specialized glue for gluing ceramics was designed specifically for pottery, porcelain, and fine china.
Key Specifications:
- Size: 30g (1.06 oz)
- Set Time: 15 seconds
- Formula: Advanced cyanoacrylate with precision tips
- Price: $8-12
This premium option includes three precision applicator tips designed for different repair types. Whether you’re working with hairline cracks, uneven surfaces, or vertical applications, there’s a tip for that.
What Makes It Stand Out: The food-safe certification combined with waterproof and heat-resistant properties makes this incredibly versatile. It maintains bond integrity through microwave heating and dishwasher cycles—rare for super glues.
Customer Feedback: Professional restorers and serious hobbyists appreciate the quality. Multiple reviewers mentioned successfully repairing valuable antiques and family heirlooms with museum-quality results.
✅ Pros:
- Professional-grade formula
- Food-safe and dishwasher-safe
- High temperature resistance
- Multiple precision tips included
❌ Cons:
- Higher price point
- Fast set time requires experience
- Smaller bottles for professional use
Best For: Valuable antiques, professional restoration, food-safe repairs, and collectors who demand invisible repairs.
Understanding Different Types of Ceramic Adhesive
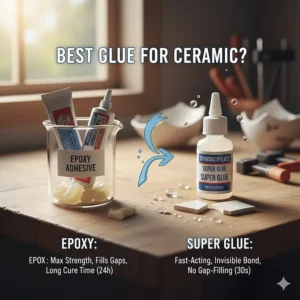
Cyanoacrylate (Super Glue): The Quick Fix Specialist
You’ve probably used super glue before, but understanding what makes cyanoacrylate special helps you choose wisely. These adhesives create instant bonds through a chemical reaction with moisture in the air and on surfaces.
When to Use: Super glues excel at small repairs, hairline cracks, and situations where you need an immediate bond. Think broken handles, chipped edges, or decorative items that don’t bear weight.
Advantages: Lightning-fast set times (seconds to minutes) mean you’re not standing there holding pieces together forever. They dry crystal clear, creating nearly invisible repairs on white or translucent ceramics. The thin consistency penetrates tiny cracks that thicker adhesives miss.
Limitations: That fast set time is also a drawback—you need perfect positioning on the first try. Most aren’t food-safe or dishwasher-safe, limiting their use for kitchenware. Temperature extremes can weaken the bond over time.
According to the Chemistry of Adhesives, cyanoacrylates polymerize rapidly when exposed to even trace amounts of water, creating long molecular chains that lock surfaces together. This explains both their speed and their sensitivity to storage conditions.
Epoxy Resins: The Heavy-Duty Champion
Two-part epoxies bring serious bonding power to the table. Mixing resin and hardener triggers a chemical reaction that creates incredibly strong, permanent bonds.
When to Use: Reach for epoxy when dealing with structural repairs, large breaks, load-bearing pieces, or outdoor applications. That extra mixing step pays off in superior durability.
Advantages: Unmatched strength—we’re talking bonds that often exceed the ceramic’s original integrity. Epoxies can fill small gaps and work with less-than-perfect breaks. They resist water, chemicals, and temperature extremes better than most alternatives.
Limitations: The mixing requirement adds complexity and mess. Set times range from 5 minutes to several hours depending on the formula. Some epoxies yellow over time when exposed to UV light.
Polyurethane Glues: The Expansion Expert
Polyurethane adhesives activate with moisture and expand as they cure, filling gaps in the process. This unique property makes them useful for specific ceramic repairs.
When to Use: Ideal for outdoor ceramics, porous materials, and situations where you need gap-filling properties. The expansion helps with uneven breaks or missing small fragments.
Advantages: Superior moisture resistance makes these perfect for planters, fountains, and bathroom applications. The expansion can strengthen joints by filling voids. Once cured, the bond is incredibly durable.
Limitations: That expansion can create messy overflow if you use too much. The foam-like appearance isn’t ideal for visible repairs on fine china. Application requires careful moisture control.
Silicone Adhesives: The Flexible Alternative
Silicone-based adhesives remain permanently flexible after curing, creating bonds that can withstand movement and vibration.
When to Use: Best for outdoor ceramics, items subject to temperature cycling, or repairs that need some flexibility. Think garden decorations, outdoor planters, or items near heat sources.
Advantages: Maintains flexibility indefinitely without becoming brittle. Excellent temperature resistance spans from below freezing to over 300°F (149°C). Naturally waterproof and UV-resistant.
Limitations: Lower bond strength compared to epoxies or super glues. Not suitable for load-bearing repairs. Some formulations emit acetic acid during curing, requiring ventilation.
How to Choose the Best Glue for Ceramic: Key Factors
Bond Strength Requirements
Not all repairs need military-grade adhesion. I’ve learned to match adhesive strength to the actual demands of each project, saving money and achieving better results.
Light-Duty Repairs: Small chips, decorative items, and pieces that won’t see rough handling work perfectly with standard cyanoacrylate adhesives. These provide adequate strength while being easier to work with and more forgiving of application errors.
Medium-Duty Applications: Daily-use items like coffee mugs, vases, and bathroom accessories benefit from rubber-toughened super glues or specialized ceramic adhesives. These handle regular use and washing without failing.
Heavy-Duty Needs: Structural repairs, outdoor ceramics, and load-bearing pieces demand two-part epoxies with tensile strengths exceeding 3000 PSI. Don’t compromise here—using weak adhesive on demanding applications sets you up for repeat failures.
The materials science of adhesion shows that different substrates require specific bonding approaches. Ceramic’s non-porous, smooth surface needs adhesives that can create molecular-level bonds.
Setting and Curing Times
Understanding the difference between “set time” and “cure time” prevents premature handling disasters. Set time indicates when you can release pressure; cure time means full strength has developed.
Fast-Setting (Seconds to Minutes): Super glues set almost instantly but take 24 hours to fully cure. This quick initial grab is perfect for small repairs but demands precise positioning from the start.
Medium-Setting (5-20 Minutes): Two-part epoxies and some specialty adhesives give you working time to align complex breaks, wipe away excess, and make adjustments. I prefer these for valuable pieces where one shot isn’t enough.
Slow-Setting (Hours): Some epoxies and polyurethane adhesives remain workable for extended periods. While this seems inconvenient, it allows for multi-piece assemblies and eliminates the stress of racing against set time.
Pro Tip: Factor in environmental conditions. Temperature and humidity affect curing rates—warmer conditions accelerate setting, while cold slows everything down.
Temperature and Moisture Resistance
Your repair location and use case dictate necessary resistance levels. Indoor decorative pieces have different needs than outdoor planters or microwave-safe dishes.
Heat Resistance: Kitchen items and anything near heat sources need adhesives rated for at least 150°F (66°C). Professional options handle temperatures up to 300°F (149°C) without softening or releasing toxic fumes.
Moisture Exposure: Bathroom fixtures, planters, and anything regularly washed requires waterproof adhesives. Look for specific “waterproof” or “water-resistant” labeling—there’s a difference. Waterproof means complete immersion won’t fail the bond; water-resistant handles splashes and humidity.
Outdoor Durability: UV exposure, temperature cycling, and weather exposure demand specialized formulas. Standard indoor adhesives break down quickly outside, even if initially strong.
Food Safety Considerations
Repairing dishes, mugs, or serving pieces? Food safety isn’t optional—it’s essential. Not all adhesives safe for general use are safe for food contact.
FDA-Approved Adhesives: Look for explicit food-safe certifications or FDA approval for food-contact surfaces. Elmer’s China and Glass Cement specifically advertises this certification and backs it up with testing.
Dishwasher Safety: Some adhesives tolerate hand-washing but fail under dishwasher conditions. Hot water, detergent exposure, and drying heat cycles stress bonds differently than manual washing.
Microwave Considerations: Heating repaired ceramics in microwaves can cause adhesives to soften or release fumes. Most manufacturers specify if their products can handle microwave temperatures.
The FDA regulates materials that contact food, including adhesives used in food containers. Using non-approved adhesives violates these guidelines and poses health risks.
Appearance After Curing
Invisible repairs separate amateur fixes from professional restoration. The best glue for ceramic should disappear once cured, leaving only the restored item visible.
Drying Clear: Most modern cyanoacrylates and many epoxies advertise “dries clear” or “crystal clear finish.” In reality, clarity varies. Premium options truly disappear; budget alternatives may yellow or show cloudiness.
Thickness Matters: Excess adhesive creates visible lines and rough textures. Applying minimal amounts and wiping away overflow before curing produces cleaner results.
Sanding and Finishing: Some adhesives accept light sanding after curing, allowing you to smooth rough edges and create seamless repairs. Others remain tacky or gum up sandpaper.
Paintability: For non-transparent ceramics, paintable adhesives let you color-match repairs. E6000 and most epoxies accept paint well; pure cyanoacrylates resist paint adhesion.
Step-by-Step Guide: How to Properly Apply Glue for Ceramic
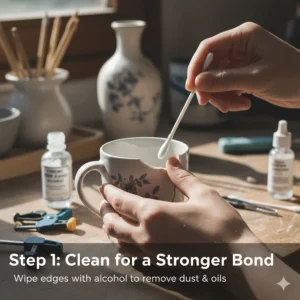
Surface Preparation (Don’t Skip This!)
I’ve seen more repairs fail due to poor prep than any other reason. Spending five extra minutes cleaning and preparing surfaces saves hours of frustration later.
Cleaning Protocol:
- Wash broken pieces with warm, soapy water to remove dirt, oils, and residue
- Rinse thoroughly—soap residue interferes with bonding
- Dry completely with lint-free cloth or paper towels
- For oily or particularly dirty surfaces, wipe with isopropyl alcohol (70% or higher)
- Let alcohol evaporate completely before proceeding
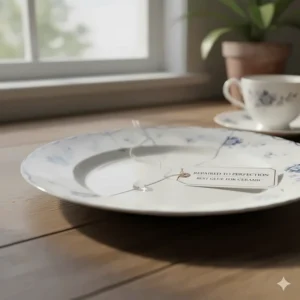
Surface Roughening (When Appropriate): Glazed ceramics present smooth, non-porous surfaces that challenge adhesion. Light sanding with fine-grit sandpaper (400-600 grit) creates microscopic texture that helps adhesives grip. This isn’t necessary for all repairs, but it dramatically improves bond strength on glossy surfaces.
Test Fitting: Before applying any adhesive, assemble all pieces dry. This identifies any missing fragments, confirms proper alignment, and lets you practice the assembly process. Mark alignment points with pencil if dealing with complex breaks.
Application Techniques for Different Adhesives
For Cyanoacrylate (Super Glue):
- Apply a thin, even layer to ONE surface only—applying to both creates excess and mess
- Use sparingly—one drop covers approximately one square inch
- Bring pieces together within 15-30 seconds (check product specifications)
- Apply firm, even pressure for the recommended set time
- Wipe away any squeeze-out immediately with paper towel
- Allow 24 hours before stressing the repair
For Two-Part Epoxies:
- Dispense equal amounts of resin and hardener onto mixing tray
- Mix thoroughly for 1-2 minutes using included stick—incomplete mixing causes weak bonds
- Apply thin layer to both surfaces using craft stick or applicator
- Join pieces within the working time (usually 5-10 minutes)
- Clamp or tape to maintain pressure during curing
- Remove excess squeeze-out before it hardens (saves cleanup headaches)
- Allow full cure time (1-24 hours depending on product) before handling
For Gel Formulas:
- Gel consistency eliminates dripping, making vertical repairs manageable
- Apply directly where needed—gel stays in place
- Use slightly more than liquid glues due to thicker consistency
- Press pieces together and maintain pressure as directed
- Gel formulas allow repositioning for several seconds before grabbing
Clamping and Support During Curing
Maintaining pressure during curing ensures intimate contact between surfaces and adhesive, maximizing bond strength.
Clamping Options:
- Rubber bands: Perfect for round objects like mugs and vases
- Painter’s tape: Gentle on glazed surfaces, easy removal
- Spring clamps: Adjustable pressure for flat pieces
- DIY supports: Sand, modeling clay, or foam cradles hold irregular shapes
- Hand pressure: For small repairs with fast-setting adhesives
Pro Tips:
- Protect finished surfaces with wax paper or plastic wrap before applying tape or clamps
- Don’t over-tighten—excessive pressure squeezes out adhesive and creates weak joints
- Check alignment immediately after clamping; make adjustments before adhesive sets
- Leave clamps in place for at least the minimum cure time (longer is better)
Common Mistakes to Avoid
Using Too Much Adhesive: More isn’t better. Excess glue weakens bonds, creates mess, and takes longer to cure. Thin layers outperform thick globs every time.
Skipping Surface Prep: Oil, dust, or moisture on ceramic surfaces compromises adhesion. Those extra few minutes cleaning and drying pay enormous dividends.
Incorrect Adhesive Selection: Using food-unsafe glue on dishes or indoor-only adhesive on outdoor items sets you up for failure. Match the product to your specific needs.
Rushing the Cure: Just because something’s set enough to handle doesn’t mean it’s fully cured. Stressing repairs before complete curing leads to sudden, disappointing failures.
Ignoring Ventilation: Some adhesives release strong fumes during curing. Work in ventilated areas and take breaks if you feel lightheaded—safety first!
Advanced Tips for Professional-Quality Ceramic Repairs
Working with Hairline Cracks
Hairline cracks present unique challenges that require specialized techniques and the right ceramic adhesive approach.
Low-Viscosity Advantage: Thin, liquid cyanoacrylates penetrate hairline cracks better than gel formulas. The capillary action draws adhesive deep into cracks invisible to the naked eye.
Application Method: Rather than applying glue to the crack, position the crack over a small puddle of adhesive. The crack will wick up glue through capillary action, filling from the inside out. This creates stronger, more complete repairs than surface application.
Pressure Technique: Gently flexing the ceramic opens hairline cracks slightly, improving adhesive penetration. Apply gentle pressure after closing to ensure the crack fills completely.
Filling Gaps and Missing Pieces
Sometimes you can’t find all the fragments, or small chips are permanently lost. Creating invisible repairs requires gap-filling strategies.
Epoxy Fillers: Two-part epoxies excel at filling small voids. Some formulations include ceramic powders that match common ceramic colors. Mix thoroughly and overfill slightly—you’ll sand flush after curing.
Sculpting Technique: For larger missing sections, build up multiple thin layers rather than one thick application. This reduces shrinkage and creates stronger fills. Allow each layer to fully cure before adding the next.
Color Matching: Mix ceramic powders, acrylic paints, or pigments into epoxy before applying. Test color matches on hidden areas first—dried color often differs from wet appearance.
Multi-Piece Assemblies
Reconstructing ceramics shattered into numerous pieces demands strategic planning and patience.
Assembly Order Strategy:
- Identify the largest piece as your base
- Fit all pieces dry and number them with removable tape
- Work from the base outward, completing one section before moving to the next
- Use fast-setting adhesive for sequential assembly
- Allow each joint to cure before stressing it with additional pieces
Temporary Support: Modeling clay, foam, or sand creates custom cradles that hold partially assembled pieces while adhesive cures. Position the work so gravity helps rather than fights your efforts.
Progressive Assembly: Don’t try to assemble everything at once. Work in stages, allowing completed sections to fully cure. This prevents the frustrating experience of a perfect assembly suddenly shifting as you add the final piece.
Creating Invisible Repair Lines
Professional restorers pride themselves on repairs so perfect they’re undetectable. These techniques help achieve that gold standard.
Minimal Adhesive: Less is always more. Apply the absolute minimum adhesive needed for structural integrity. Excess creates visible lines and messy squeeze-out.
Alignment Precision: Perfect alignment matters more than adhesive strength. Misaligned repairs scream “broken” no matter how strong the bond. Take time to achieve seamless alignment.
Surface Finishing: After curing, carefully remove any adhesive squeeze-out with a sharp craft knife. For epoxy repairs, light sanding with progressively finer grits (600 → 1000 → 2000) creates flush, invisible joints.
Optional Touch-Up: For chips visible after repair, touch-up paints designed for ceramics can blend repairs seamlessly. Practice on hidden areas first—paint matching requires experience.
Safety Precautions When Using Ceramic Adhesive
Skin Contact Prevention
Cyanoacrylate adhesives bond to skin almost instantly, creating painful removal situations. Following basic precautions prevents these mishaps.
Protective Gear: Disposable nitrile gloves provide excellent protection while maintaining dexterity. Avoid latex gloves—super glue can react with latex proteins. Keep paper towels within reach for immediate cleanup.
Application Tools: Use craft sticks, toothpicks, or precision applicators rather than fingers. This creates distance between your skin and active adhesive.
First Response: If adhesive contacts skin, don’t panic. Avoid pulling bonded skin apart—this causes tears and damage. Instead, soak the affected area in warm, soapy water and gently work surfaces apart as the adhesive softens. Acetone-based nail polish remover can help, but use sparingly as it dries skin.
Ventilation Requirements
Several adhesive types release volatile organic compounds (VOCs) during curing. These fumes can cause headaches, dizziness, and respiratory irritation.
Work Environment: Choose well-ventilated spaces for any adhesive work. Open windows, use fans, and consider outdoor application when weather permits.
Sensitive Individuals: People with asthma, chemical sensitivities, or respiratory conditions should take extra precautions. Consider low-VOC or “odorless” formulations specifically designed for sensitive users.
Duration Matters: While initial application creates the strongest fumes, some adhesives continue off-gassing during the full cure period. Don’t assume finishing the repair means the end of fume exposure.
The EPA’s guidelines on VOCs highlight the importance of proper ventilation when working with adhesives and sealants, particularly in confined spaces.
Storage and Disposal
Proper storage extends adhesive life and prevents accidents; responsible disposal protects the environment.
Storage Best Practices:
- Store all adhesives upright in cool, dry locations
- Keep away from direct sunlight and heat sources
- Ensure caps are tightly sealed—air exposure ruins adhesives
- Don’t store in refrigerators (condensation accelerates degradation)
- Keep out of reach of children and pets
- Write purchase dates on containers to track age
Disposal Guidelines:
- Never pour liquid adhesives down drains—they can clog pipes
- Solidified adhesives can usually go in household trash (check local regulations)
- Take partially full containers to household hazardous waste facilities
- Empty, dried-out tubes may be recyclable depending on material
- Remove caps before disposing (different materials)
Child and Pet Safety
Adhesives present multiple hazards to curious kids and pets who lack understanding of chemical dangers.
Prevention Measures:
- Store all adhesives in locked cabinets or high shelves
- Never leave open adhesives unattended, even briefly
- Clean up completely after repairs—dried glue residue attracts attention
- Dispose of used applicators, mixing sticks, and containers immediately
- Keep acetone and other solvents equally secure
Emergency Response: If a child or pet ingests adhesive, contact poison control immediately (1-800-222-1222 in the US). Have the product container available to provide specific information. Don’t induce vomiting unless directed by medical professionals.
Troubleshooting Common Ceramic Glue Problems
Repair Won’t Hold or Keeps Breaking
This frustrating problem usually stems from one of several common causes, all fixable with proper technique.
Surface Contamination: Oil, grease, dust, or moisture prevents proper adhesion. Solution: Strip the failed repair completely, clean surfaces with isopropyl alcohol, and ensure complete drying before reapplying adhesive.
Insufficient Adhesive: Using too little glue creates weak spots and incomplete bonds. Solution: While excess creates problems, ensure complete coverage of bonding surfaces with a thin, even layer.
Wrong Adhesive Type: Using adhesives unsuited to your specific repair guarantees failure. Solution: Match adhesive selection to repair demands—heavy-duty needs require epoxy, quick fixes work with super glue.
Premature Stress: Handling repairs before full cure breaks bonds before they reach maximum strength. Solution: Respect cure times—if it says 24 hours, wait 24 hours. Test gently before full use.
Glue Won’t Come Out of Container
Dried adhesive blocking applicator tips frustrates everyone eventually. Prevention beats cure in these situations.
Prevention Strategies:
- Wipe tips clean immediately after each use
- Store bottles upright to prevent backflow into cap
- For cyanoacrylates, store with cap on tight to minimize air exposure
- Don’t squeeze excessive amounts trying to force clogs free
Clearing Clogs:
- For super glue, carefully insert a pin or thin wire to clear dried adhesive
- Soak clogged tips in acetone (nail polish remover) for several minutes
- Replace clogged nozzles if product includes extras
- Cut tips with sharp scissors to create new openings (last resort)
Visible White Residue or Cloudiness
That dreaded white haze around repair lines, called “blooming” or “frosting,” comes from cyanoacrylate fumes reacting with moisture and depositing on nearby surfaces.
Prevention:
- Use minimal adhesive—excess fumes cause more blooming
- Ensure good ventilation to disperse fumes quickly
- Avoid breathing directly on fresh repairs (breath moisture accelerates blooming)
- Some “low-bloom” formulas minimize this issue
Removal:
- Light blooming often disappears as adhesive fully cures
- Gentle wiping with damp cloth removes surface deposits
- For stubborn residue, very light rubbing with fine polish can help
- On non-glazed ceramics, blooming may be permanent
Bonds Too Fast—Pieces Misaligned
Quick-setting adhesives don’t forgive positioning errors. Preparation prevents this problem.
Pre-Assembly Dry Run: Always test-fit pieces without adhesive first. Mark alignment points with pencil if necessary. Practice the assembly motion so it becomes automatic.
Working Time Extension: Some cyanoacrylates offer “slow-set” formulas with extended working times. Consider switching products if standard formulas prove too fast.
Strategic Application: Apply adhesive to only one surface at a time. This gives you precious extra seconds before bond initiation. Have clamps or tape ready before applying adhesive.
Accelerator Avoidance: Some adhesive systems include accelerator sprays that trigger instant curing. Skip these unless you’re absolutely confident in alignment.
Price Range & Value Analysis
Budget Options ($3-6)
Entry-level ceramic adhesives deliver surprising value when matched to appropriate applications.
Typical Products: Krazy Glue Original, store-brand cyanoacrylates, basic Elmer’s products
Best Value Scenarios:
- Simple hairline crack repairs
- Decorative items without structural demands
- Practice repairs on low-value ceramics
- Keeping emergency repair kits in multiple locations
Limitations: Lower bond strength, less sophisticated formulations, minimal packaging innovations, often smaller quantities
Who Should Buy: Budget-conscious shoppers, occasional repair needs, non-critical applications
Mid-Range Options ($6-10)
This sweet spot balances performance with affordability, representing the best value for most users.
Typical Products: Gorilla Super Glue Gel, Loctite Ultra Gel Control, J-B Weld ClearWeld, E6000 Craft Adhesive
Best Value Scenarios:
- Regular repair needs justify quality investment
- Balance of performance and cost
- Features like anti-clog caps and ergonomic applicators add value
- Larger sizes reduce per-use costs
Performance Gains: Stronger bonds, better temperature resistance, superior packaging designs, specialized formulations for specific needs
Who Should Buy: Most homeowners, regular DIYers, anyone valuing reliability over minimum cost
Premium Options ($10-20+)
Professional-grade adhesives justify higher prices through superior performance and specialized capabilities.
Typical Products: Professional epoxy systems, food-safe specialized formulas, restoration-grade adhesives, bulk professional packaging
Best Value Scenarios:
- Valuable or irreplaceable items warrant premium protection
- Professional restoration work
- Food-safe certifications required
- Multiple repairs planned (bulk purchasing)
Performance Advantages: Maximum bond strength, museum-quality clarity, certified food-safe formulations, advanced applicator systems, larger quantities
Who Should Buy: Professional restorers, collectors, serious hobbyists, anyone repairing valuable ceramics
Long-Term Cost Considerations
Looking beyond initial purchase price reveals true value.
Shelf Life Impact: Many adhesives deteriorate within 1-2 years after opening. Buying massive quantities doesn’t save money if most goes to waste. Match quantity to anticipated use within the product’s viable lifespan.
Repair Longevity: Cheap adhesives often require repeated repairs, while quality products create permanent fixes. One $8 repair beats three $4 repairs every time.
Multipurpose Value: Versatile adhesives that handle multiple materials and applications provide better value than specialized single-use products. Unless you need specific properties (food-safe, ultra-clear), choose multipurpose options.
Frequently Asked Questions
❓ Can you glue ceramic back together permanently?
❓ What is the strongest adhesive for ceramic?
❓ How do you fix ceramic that holds food safely?
❓ Will ceramic glue work on porcelain and pottery?
❓ How long should ceramic glue cure before using the item?
Conclusion: Selecting Your Perfect Ceramic Adhesive
Finding the best glue for ceramic ultimately comes down to matching product capabilities to your specific repair needs. Throughout this guide, we’ve explored how different adhesive types—from lightning-fast cyanoacrylates to heavy-duty epoxies—excel in different scenarios.
For quick household repairs on decorative items, you can’t beat the convenience and reliability of Gorilla Super Glue Gel XL. It’s my personal go-to for 80% of ceramic repairs, offering the perfect balance of speed, strength, and ease of use. The dual applicator system and anti-clog cap make it worth every penny.
When structural integrity matters most—outdoor planters, heavy-duty repairs, or pieces that bear weight—J-B Weld ClearWeld delivers professional-grade performance that often exceeds the ceramic’s original strength. That 3900 PSI tensile strength isn’t marketing hype; it’s engineering excellence.
For kitchen items and food-contact surfaces, don’t compromise on safety. Elmer’s China and Glass Cement provides peace of mind with its food-safe certification while delivering solid performance for everyday dishware repairs.
The key takeaways? Always prepare surfaces thoroughly, choose adhesives appropriate to your specific needs, and respect curing times even when you’re eager to use your repaired items. These three principles prevent more repair failures than any other factors.
Remember that the best glue to glue ceramic depends on context. A $4 bottle of super glue perfectly repairs a decorative vase, while a $20 professional-grade adhesive makes sense for grandmother’s heirloom china. Match investment to value—both monetary and sentimental.
Start with surface preparation, choose your adhesive wisely, apply it carefully, and give it adequate time to cure. Follow this approach, and you’ll achieve professional-quality ceramic repairs that last for years.
🎯 Transform Your Broken Ceramics into Success Stories Today! 🌟
Stop letting broken ceramics gather dust in cabinets! The products recommended in this guide represent the best options available in 2025, tested and proven by thousands of successful repairs. Whether you’re fixing a sentimental keepsake or rescuing expensive dishware, you now have the knowledge to achieve professional results. Click any product link above to check current prices, read verified customer reviews, and start your repair journey with confidence. Your perfect repair is just one click away!
Recommended for You
- Leather Sofa Paint: 7 Best Products to Transform Your Furniture in 2025
- Best Glue Sneakers: 7 Top Adhesives That Actually Work in 2025
- Best Glue for Shoe Soles: 7 Top Picks That Actually Work (2025)
Disclaimer: This article contains affiliate links. If you purchase products through these links, we may earn a small commission at no additional cost to you.
✨ Found this helpful? Share it with your friends! 💬🤗