In This Article
Picture this: you pull into your garage after an amazing paddling adventure, and there’s absolutely nowhere to put your kayak. It’s leaning awkwardly against the wall, taking up half your parking space, or worse—lying on the floor where someone might trip over it. Sound familiar? You’re not alone in this storage struggle.
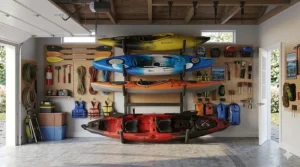
Finding the right kayak storage rack for garage spaces transformed my own cluttered mess into an organized haven where I can actually park my car AND store three kayaks. The secret isn’t having more space—it’s using the space you already have smarter. Whether you’re working with a compact single-car garage or a spacious three-car setup, the right storage solution can accommodate your watercraft while keeping everything accessible.
A quality kayak storage rack for garage use protects your investment from UV damage, prevents hull warping, and keeps your equipment ready for spontaneous weekend adventures. The market offers everything from simple wall mounted kayak hanger options to sophisticated ceiling kayak storage systems that hoist your boat completely out of the way. Each type serves different needs, budgets, and garage configurations.
In this comprehensive guide, I’ve tested and researched dozens of storage solutions to bring you the seven best options available in 2026. From budget-friendly horizontal kayak rack designs to premium multi-boat systems, you’ll discover exactly what works for your specific situation. We’ll cover installation requirements, weight capacities, space-saving strategies, and real user experiences to help you make the smartest choice.
Quick Comparison Table: Top Kayak Storage Solutions
| Product | Type | Capacity | Best For | Price Range |
|---|---|---|---|---|
| RAD Sportz Kayak Hoist 2-Pack | Ceiling Hoist | 125 lbs each | Overhead storage | $40-60 |
| StoreYourBoard G-Kayak Wall Rack | Wall Mount | 400 lbs total | Multiple kayaks | $120-180 |
| WALMANN 6-Tier Freestanding Rack | Freestanding | 660 lbs total | Large collections | $180-250 |
| Bonnlo Kayak Stand | Freestanding | 175 lbs each | Portable storage | $90-140 |
| StoreYourBoard Ceiling Hoist | Ceiling Hoist | 150 lbs | Premium lifting | $65-85 |
| WALMANN Wall Mount Hooks | Wall Mount | 200 lbs | Single kayak | $35-55 |
| JY PERFORMANCE 3-Tier Rack | Freestanding | 300 lbs total | Weather-resistant | $110-160 |
💬 Just one click – help others make better buying decisions too!😊
Top 7 Kayak Storage Rack for Garage: Expert Analysis
1. RAD Sportz Kayak Hoist 2-Pack – Best Budget Ceiling Solution
The RAD Sportz Kayak Hoist stands out as the most affordable ceiling kayak storage option that actually works. This two-pack system uses a smart pulley mechanism with an automatic locking brake, letting you lift kayaks up to 125 pounds per hoist with minimal effort.
Key Specifications:
- Weight capacity: 125 lbs per hoist
- Ceiling height compatibility: Up to 12 feet
- Rope length: Sufficient for standard garage heights
What makes this product exceptional is the rope-locking mechanism that prevents accidental drops. The rubber-coated hooks protect your kayak’s hull from scratches, while the included nylon straps keep everything secure overhead. Customer Jennifer from Oregon shared that she’s been using hers for “over three years without any issues, and it freed up so much floor space.”
✅ Pros:
- Incredibly affordable for a 2-pack system
- Easy one-person operation with rope brake
- Rubber-coated hooks prevent hull damage
❌ Cons:
- Rope quality could be better (some users upgrade)
- Installation requires ceiling joist mounting
Price: Typically $40-60 for the 2-pack
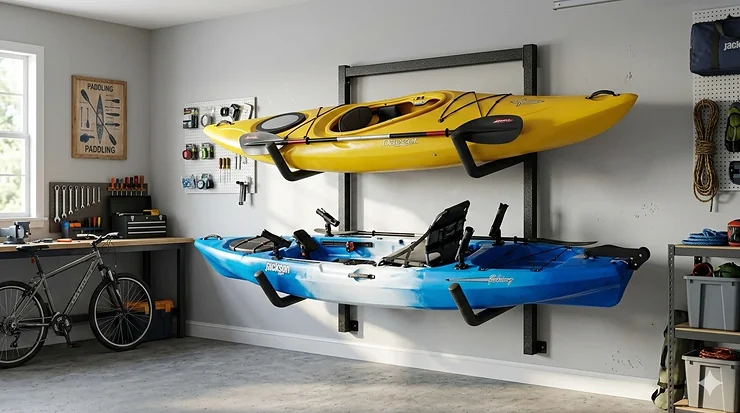
2. StoreYourBoard G-Kayak Wall Rack – Premium Multi-Boat Storage
For serious kayakers with multiple boats, the StoreYourBoard G-Kayak Wall Rack delivers professional-grade organization. This adjustable wall mounted kayak hanger accommodates four full-size kayaks while maintaining easy access to each one.
Key Specifications:
- Total capacity: 400 lbs (100 lbs per level)
- Dimensions: 7.88″D x 46.88″W x 46″H
- Material: Powder-coated steel construction
The adjustable arms are the game-changer here. You can customize the height of each level to fit different kayak sizes, from compact whitewater models to long sea kayaks. The powder-coated steel finish resists weather exposure, making it suitable for both garage and shed installations. Users consistently praise the solid construction, with Michael from California noting it “holds our fishing kayaks without any sagging or bending.”
✅ Pros:
- Holds four kayaks on a single wall mount
- Fully adjustable arm heights
- Weather-resistant powder coating
❌ Cons:
- Higher price point than basic racks
- Requires proper stud mounting for safety
Price: $120-180 depending on configuration
3. WALMANN 6-Tier Freestanding Rack – Maximum Storage Capacity
The WALMANN 6-Tier Freestanding Rack is your answer when you need serious storage without drilling into walls. This beast accommodates up to six kayaks with a combined weight capacity of 660 pounds, perfect for families or rental operations.
Key Specifications:
- Six adjustable tiers
- 110 lbs capacity per tier (660 lbs total)
- Black powder-coated steel construction
As a freestanding kayak rack, this model offers flexibility that wall mounts can’t match. Move it around your garage as needed, or roll it outside during summer for easier boat access. The adjustable arm heights ensure proper support for various kayak widths and lengths. The extended base provides exceptional stability, and the protective fabric corner covers prevent any damage to your boats. Derek from Florida uses his for both kayaks and paddleboards, calling it “the most versatile storage solution I’ve found.”
✅ Pros:
- No wall mounting required
- Massive 660 lbs total capacity
- Adjustable for different boat sizes
❌ Cons:
- Takes up significant floor space
- Assembly required (about 45 minutes)
Price: $180-250
4. Bonnlo Kayak Stand – Best Portable Solution
The Bonnlo Kayak Stand brings portability to kayak storage with its lockable wheel system. This versatile freestanding option works equally well in garages, sheds, or even outdoors near the water.
Key Specifications:
- Capacity: 175 lbs per kayak
- Width adjustable: 51″ to 67″
- Four lockable industrial casters
What sets this apart is the mobility factor. The four lockable wheels mean you can easily reposition your kayaks without emptying them first—perfect for seasonal storage transitions. The width adjustment accommodates wider loads like paddleboards and SUPs alongside standard kayaks. The anti-UV foam support covers protect your gear from scratches while providing secure grip. Sarah from Washington appreciates that she can “wheel it to different spots in the garage depending on which kayaks we’re using that weekend.”
✅ Pros:
- Lockable wheels for easy repositioning
- Width adjusts from 51″ to 67″
- Reinforced triangular base for stability
❌ Cons:
- Lower per-kayak capacity than some competitors
- Wheels may wear over time with heavy use
Price: $90-140 depending on capacity (2, 4, or 6 kayak models)
5. StoreYourBoard Ceiling Hoist – Premium Overhead System
The StoreYourBoard Ceiling Hoist represents the premium tier of ceiling kayak storage, offering enhanced stability and higher weight capacity than budget alternatives. This system handles boats up to 150 pounds with smooth, reliable operation.
Key Specifications:
- Weight capacity: 150 lbs
- Ceiling height range: 10 to 14 feet
- Enhanced stability center strap system
The standout feature is the center connecting strap that links both pulley points, preventing your kayak from shifting during long-term storage. This extra stability matters when you’re storing expensive composite kayaks that you want perfectly positioned. The mechanical advantage system makes lifting feel effortless even when working solo. Users report the quality steel components and auto-locking brake provide confidence that their kayaks are secure overhead. Tom from Maine has “used it through two winters without any issues, and the auto-lock gives me peace of mind parking underneath.”
✅ Pros:
- Higher 150 lbs weight capacity
- Center stability strap prevents shifting
- Premium build quality from USA-based company
❌ Cons:
- More expensive than basic hoists
- Requires ceiling joist installation
Price: $65-85
6. WALMANN Wall Mount Hooks – Best Single Kayak Solution
For single-boat owners, the WALMANN Wall Mount Hooks offer the perfect balance of simplicity and functionality. This pair of heavy-duty hooks includes integrated paddle storage, keeping all your gear organized in one spot.
Key Specifications:
- Capacity: 200 lbs total
- Material: 1.5mm thick steel tubing
- Includes screw-in paddle hooks
These hooks excel through thoughtful design details. The thick steel construction resists bending even under full load, while the protective padding prevents hull scratches. The screw-in paddle hooks below each main hook mean your paddles hang conveniently alongside your kayak. Installation is straightforward when mounted to wall studs, and the clean black powder coat finish looks professional. Lisa from Texas calls them “exactly what I needed for my recreational kayak—simple, strong, and my paddle is right there when I need it.”
✅ Pros:
- Integrated paddle storage hooks
- Extra-thick 1.5mm steel construction
- Affordable single-kayak solution
❌ Cons:
- Must mount to wall studs for safety
- Limited to one kayak per pair
Price: $35-55 per pair
7. JY PERFORMANCE 3-Tier Rack – Weather-Resistant Outdoor Option
The JY PERFORMANCE 3-Tier Rack combines indoor convenience with outdoor durability. This freestanding horizontal kayak rack features weather-resistant construction that stands up to the elements while maintaining organized storage.
Key Specifications:
- Three-tier design
- 100 lbs per tier (300 lbs total)
- Dimensions: 45.9″ x 34.4″ x 50″
- Black powder-coated finish
Built specifically for both garage and outdoor use, this rack features anchor points on each tier for added security during storage. The compact footprint fits easily in most garage spaces without overwhelming the area. The weather-resistant coating means you can position it under a deck, on a dock, or in an open garage without worrying about rust. Assembly is quick with all hardware included, and the design accommodates various watercraft types. Kevin from Oregon uses his outside his boathouse and reports “it’s held up perfectly through two rainy Pacific Northwest winters.”
✅ Pros:
- True weather-resistant construction
- Anchor points for secure storage
- Compact space-saving design
❌ Cons:
- Lower total capacity than 6-tier models
- Requires assembly
Price: $110-160
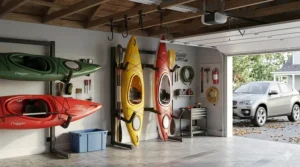
Understanding Different Kayak Storage Methods
When you’re exploring kayak storage rack for garage options, you’ll encounter three primary categories: wall mounted systems, ceiling-based solutions, and freestanding racks. Each approach offers distinct advantages depending on your garage layout, kayak collection size, and accessibility needs.
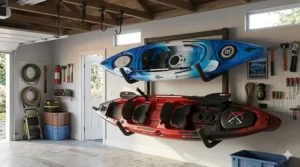
Wall Mounted Kayak Hanger Systems
Wall mounted kayak hanger solutions maximize vertical space by securing your watercraft directly to garage walls. These systems attach to wall studs using heavy-duty lag bolts, distributing the kayak’s weight across multiple mounting points. The beauty of wall storage lies in keeping floor space completely clear while maintaining relatively easy access to your boats.
Modern wall mounts come in several configurations. Simple J-hook designs support the kayak on its side, while cradle systems hold the boat horizontally with padded arms. Adjustable wall racks let you customize spacing for multiple kayaks of varying sizes. The key consideration is finding your wall studs—these racks must anchor into solid wood framing, never just drywall, to safely support your kayak’s weight.
Installation typically requires a drill, stud finder, level, and about thirty minutes per kayak position. Most systems include all necessary hardware, though you may want to upgrade to stainless steel bolts if your garage experiences high humidity. Wall mounts work brilliantly in garages with limited ceiling height or when you prefer your kayaks at eye level for quick inspection and maintenance.
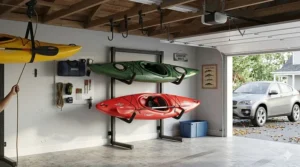
Ceiling Kayak Storage Solutions
Ceiling kayak storage represents the ultimate space-saving approach, lifting your watercraft completely overhead. Pulley-based hoist systems use mechanical advantage to make lifting surprisingly easy, even for heavier fishing or tandem kayaks. You pull a rope hand-over-hand, and the kayak rises smoothly to the ceiling where it locks securely in place.
These systems excel in garages where wall space is already occupied by tools, bikes, or other equipment. By utilizing “dead space” near the ceiling, you can park vehicles underneath while keeping kayaks safe overhead. Modern hoists include safety features like automatic rope locks that prevent accidental drops and rubber-coated hooks that protect your kayak’s hull.
The main consideration is ceiling height—you’ll need at least 8 feet for comfortable clearance underneath, with 10-12 feet being ideal. Installation requires locating ceiling joists and ensuring they’re rated for the load. While slightly more complex to install than wall mounts, ceiling systems provide unmatched floor and wall clearance that serious space-savers appreciate.
Freestanding Rack Advantages
Freestanding racks offer flexibility that mounted systems can’t match. These self-supporting structures require zero wall or ceiling attachment, making them perfect for renters or anyone hesitant about drilling holes. You can reposition freestanding racks seasonally—keep them in the garage during winter, then roll them outside near the water during paddling season.
Multi-tier freestanding designs accommodate several kayaks in a relatively compact footprint. The best models include adjustable arms that customize to different kayak widths and shapes. Many feature wheels or casters for easy repositioning, though you’ll want locking wheels to prevent unwanted movement.
The trade-off is floor space consumption. Freestanding racks occupy more square footage than wall or ceiling options, though their portability often justifies this. They’re particularly valuable in shared garage spaces where permanent modifications aren’t allowed, or when you anticipate moving and want to take your storage system with you. Quality freestanding racks distribute weight through wide, stable bases that won’t tip even when fully loaded.
Essential Features to Consider
Weight Capacity and Safety Ratings
Understanding weight capacity matters more than many buyers realize. Don’t just check if the rack supports your kayak’s current weight—consider the kayak fully loaded with fishing gear, water, and any modifications you might add. Most recreational kayaks weigh 45-75 pounds, fishing kayaks run 60-100 pounds, and tandem models can exceed 100 pounds before adding any gear.
Quality manufacturers provide both per-level and total weight ratings. A rack might hold 100 pounds per tier but only 400 pounds total across four tiers. Always verify both numbers and add a safety margin—if your kayak weighs 70 pounds, choose a system rated for at least 100 pounds to account for dynamic loading during placement and retrieval.
Safety certifications and testing matter significantly. Look for products that specify their testing standards and construction materials. Powder-coated steel offers excellent strength and corrosion resistance. Avoid systems that seem flimsy or provide vague weight specifications. The extra cost of properly-rated equipment is nothing compared to replacing a damaged kayak or, worse, dealing with an injury from equipment failure.
Material Quality and Durability
The material composition of your kayak storage rack for garage determines its longevity and performance. Steel construction dominates quality racks, with powder coating providing rust resistance critical in humid garage environments. The coating thickness matters—premium systems use multiple coating layers that resist chipping and provide years of protection.
Steel gauge indicates thickness and strength. Thicker steel (lower gauge numbers) resists bending under load but adds weight and cost. Most quality racks use 14-16 gauge steel for structural components, providing excellent strength without excessive bulk. Reinforced connection points where arms attach to main frames indicate thoughtful engineering that prevents failure at stress points.
Padding and protective materials deserve attention too. Quality racks incorporate foam, rubber, or padded fabric where your kayak contacts the rack. These materials prevent hull damage, scratches, and pressure points that can lead to deformation during long-term storage. UV-resistant padding extends lifespan for racks used in outdoor or partially-exposed locations.
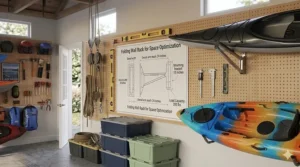
Space Optimization Strategies
Maximizing your available space requires strategic thinking about rack placement and kayak orientation. Measure your garage carefully before purchasing, noting ceiling height, wall stud locations, and clearance around vehicles or other equipment. A quick sketch helps visualize how different storage approaches fit your specific layout.
Consider kayak orientation options. Storing kayaks on their sides uses less wall projection than horizontal storage but may require more vertical space. Angled storage can fit more boats in less space while maintaining accessibility. Some wall systems allow stacked storage where kayaks nest partially together, though this complicates accessing lower boats.
Think about seasonal access patterns too. Boats you use frequently should occupy the most accessible positions, while off-season kayaks can go higher or deeper in storage arrays. Adjustable systems let you reconfigure as your needs change throughout the year. Plan for a minimum of 6-12 inches of clearance around stored kayaks for comfortable loading and unloading.
Installation Requirements
Installation complexity varies dramatically across kayak storage systems. Simple wall hooks might require just a drill, level, and thirty minutes, while ceiling hoist systems need more substantial preparation including joist location, rope routing, and safety testing.
Wall-mounted systems demand stud location—never trust drywall alone to support kayak weight. A quality stud finder is essential, and you’ll want to drill pilot holes before installing lag bolts. Most wall mounts include templates that simplify positioning and ensure level installation. Budget extra time for multi-kayak systems where precise alignment matters for aesthetic and functional purposes.
Ceiling installations require different considerations. Joist spacing might not align perfectly with your ideal kayak position, necessitating bridging boards between joists. Ceiling hoists need clear paths for rope routing and comfortable operating heights for cleats or locking mechanisms. Some garages have finished ceilings that complicate installation, while exposed joists simplify the process.
Freestanding racks offer the easiest “installation”—often just assembly following included instructions. Most arrive partially assembled requiring only connecting main sections and adjusting arms to your preferred configuration. The trade-off is the time spent on assembly rather than mounting, typically 30-60 minutes depending on complexity.
How to Choose the Perfect Kayak Storage Rack for Garage
Assess Your Garage Space
Begin by conducting a thorough garage inventory. Measure ceiling height from floor to lowest obstruction, wall lengths between studs, and available floor space after parking vehicles. Note the locations of electrical outlets, light fixtures, garage door tracks, and any utilities that might interfere with rack placement.
Create a scale sketch or use simple measurement apps to visualize different rack configurations. Consider access patterns—you need comfortable clearance to load and unload kayaks without wrestling them around obstacles. Factor in door swing paths, vehicle door opening space, and walking routes through the garage.
Document your findings with photos from multiple angles. These references prove invaluable when shopping online and trying to visualize how products fit your specific space. Pay special attention to any quirks like angled walls, support posts, or storage already in place that might limit your options.
Determine Your Storage Needs
Count your current kayaks and consider future acquisitions. Many paddlers start with one boat and gradually expand their fleet as they explore different water types and activities. Choosing a system that accommodates growth saves money and hassle compared to upgrading later.
Evaluate your kayak types and sizes. A 10-foot recreational kayak has very different storage requirements than a 17-foot sea kayak or 14-foot fishing kayak loaded with gear. Measure your longest and widest boats, noting any unusual features like rudders, skegs, or mounted accessories that might require extra clearance.
Think about access frequency too. Kayaks you paddle weekly need different storage than boats used only for annual multi-day trips. Frequently-used boats should occupy the most accessible positions, while seasonal equipment can go in less convenient locations. Consider whether you need to access all boats simultaneously or if you can stack or nest them.
Budget Planning
Kayak storage rack for garage solutions span a wide price range, from $30 basic wall hooks to $300+ premium multi-boat systems. Establish your budget early but remain flexible for quality differences that impact long-term satisfaction and safety.
Budget considerations extend beyond initial purchase price. Factor in installation costs if you’re hiring help, particularly for ceiling systems requiring joist reinforcement. Include expenses for any tools you’ll need to purchase, upgraded hardware for coastal or humid environments, and optional accessories like additional straps or padding.
Consider the value proposition of different price points. A $50 wall mount that requires replacement after two years costs more long-term than a $120 system lasting ten years. Reviews mentioning durability and manufacturer warranties indicate products worth the investment. Sometimes splitting the difference between budget and premium options provides the best balance of cost and capability.
Don’t forget hidden costs like potential garage modifications. If your ideal ceiling system requires installing cross-bracing between joists, budget for materials and labor. Wall systems might need stud reinforcement in older garages. Account for these possibilities during planning to avoid budget surprises mid-project.
Read User Reviews and Ratings
Customer reviews provide insights that product descriptions never reveal. Look beyond star ratings to read detailed experiences, particularly from users with similar garage setups and kayak types. Pay attention to installation challenges, long-term durability reports, and any recurring issues across multiple reviews.
Focus on verified purchase reviews when possible, as these come from actual users rather than promotional sources. Reviews with photos showing installed systems in real garages help visualize how products perform in typical environments. Note how manufacturers respond to negative reviews—active, helpful responses indicate companies standing behind their products.
Compare reviews across multiple retailers to get broader perspective. A product might show 4.5 stars on Amazon but reveal different issues in reviews on specialty paddling sites. Reddit paddling communities often provide brutally honest feedback about what works and what doesn’t, though verify information against multiple sources.
Watch for review patterns around specific issues. If multiple users mention difficult installation, weak welds, or inadequate padding, take these seriously even if overall ratings remain positive. Conversely, isolated negative reviews about easily-avoided issues (like not using proper anchors) carry less weight than systemic design problems.
Installation and Setup Guide
Wall Mounted Installation Steps
Installing a wall mounted kayak hanger begins with precise stud location. Use a quality stud finder to locate solid framing, marking positions with light pencil marks. Verify findings by drilling small pilot holes—you should hit solid wood about 3/4 inch deep. Studs typically space 16 or 24 inches apart in modern construction.
Position your first hook or rack using a level to ensure horizontal alignment. Mark mounting hole locations with a pencil, then drill pilot holes slightly smaller than your lag bolts. This prevents wood splitting while providing solid grip. Insert wall anchors or lag bolts according to manufacturer specifications, tightening firmly but not over-torquing which can strip threads.
For multi-kayak systems, install the first rack section completely, then use it as reference for spacing additional sections. A laser level helps maintain consistent height across long walls. Test each mounted section by hanging weight equivalent to your kayak before trusting it with your actual boat. Make any position adjustments now while modifications remain simple.
Ceiling Hoist Installation
Ceiling kayak storage installation demands attention to joist location and load distribution. Exposed joists simplify this process—you can see exactly where to mount hardware. Finished ceilings require careful stud finding and possibly cutting small access holes to verify joist locations before drilling.
Mount pulley brackets directly to joists using lag bolts rated for overhead loads. If your ideal kayak position doesn’t align with joist locations, install a sturdy cross-beam between joists and mount to that beam. The beam distributes load across multiple joists, providing safe support even off-center from individual joists.
Route lifting ropes through pulleys following manufacturer diagrams. Ensure ropes move freely without binding or rubbing on sharp edges. Install the rope cleat or locking mechanism at comfortable operating height—you should be able to reach it easily while maintaining control of the kayak during lowering. Test the entire system with weight before your first kayak, verifying smooth operation and secure locking.
Freestanding Rack Assembly
Assembling freestanding racks typically follows logical progression from base to top. Clear adequate workspace—spreading parts across the garage floor makes identifying components easier. Organize hardware by type using small containers, preventing mix-ups that delay assembly.
Follow manufacturer instructions precisely, especially regarding bolt tightening sequence. Many racks require partially tightening all connections before final tightening, ensuring proper alignment across the structure. Use included wrenches or specified tool sizes to avoid stripping bolt heads or over-tightening which can crack welds.
Position arms and supports according to your specific kayak dimensions before fully tightening. Test-fit a kayak during assembly to verify comfortable placement and adequate support. Make adjustments while the structure remains partially assembled rather than after complete tightening. Once assembled, test stability by gently rocking the entire unit—quality racks should show minimal movement even when fully loaded.

Maintenance and Care Tips
Regular Inspection Schedule
Establish monthly inspection routines for your kayak storage rack for garage system. Check mounting bolts for looseness, retightening any that have shifted. Examine welds and connection points for cracks or stress signs, particularly where arms attach to main structures. Inspect straps, ropes, and padding for wear, replacing before complete failure.
Seasonal deep inspections catch developing issues before they become serious. Remove kayaks and thoroughly examine all rack components. Look for rust formation, coating chips, or structural deformation. Test mechanical components like pulley wheels, rope locks, and adjustment mechanisms. Clean accumulated dust and debris that can hide emerging problems.
Document your inspections with quick photos and notes. This record helps track gradual changes that might not be obvious inspection-to-inspection. Note the date of any part replacements or adjustments, building a maintenance history that informs future care decisions. Most quality racks require minimal maintenance, but systematic inspection ensures problems get caught early.
Protecting Your Kayaks During Storage
Proper kayak positioning prevents hull damage during storage. Never store kayaks directly on hard garage floors—this causes pressure points that deform hulls over time. Position kayaks on racks so weight distributes evenly across padded support points, typically near bulkheads where kayaks naturally have reinforcement. According to REI’s expert kayak storage guidance, supporting your boat at the bulkheads ensures optimal weight distribution during extended storage periods.
Avoid over-tightening straps or supports. Kayak hulls need some flexibility—compressing them too firmly for months can cause permanent deformation. Straps should hold kayaks securely without visible compression of the hull. Check positioning monthly and adjust if you notice any hull flattening developing.
Consider using cockpit covers even for indoor storage. These inexpensive accessories keep dust, insects, and debris out of your kayak interior. They also prevent curious pets or children from exploring inside stored kayaks. Removable hatch covers should be loosened during long-term storage, allowing air circulation that prevents mildew formation in sealed compartments.
UV protection matters even in garages. While garages offer more protection than outdoor storage, windows and garage door openings still admit harmful UV rays. Position racks away from direct sunlight when possible, or use UV-protective sprays on kayak hulls. Old Town Watercraft’s storage guide emphasizes that UV protection extends kayak lifespan significantly by preventing material degradation and color fading, even during indoor storage.
Seasonal Adjustments
Winter storage requires special considerations in cold climates. Ensure kayaks are completely dry before long-term storage—trapped water can freeze, expand, and crack hulls. Remove any drain plugs and tip kayaks to ensure complete drainage. Store kayaks in positions allowing air circulation around all surfaces, preventing moisture accumulation.
Summer brings different challenges, particularly heat exposure. Garages can become extremely hot, and combined heat and pressure from racks can deform kayak hulls. If your garage regularly exceeds 90°F, consider loosening straps slightly or repositioning kayaks to reduce pressure points. Some paddlers rotate kayak positions monthly, distributing any stress across different hull areas.
Spring preparation involves thorough inspection before the paddling season. Check your rack system for winter damage, retightening any bolts loosened by temperature cycling. Inspect kayaks for cracks, particularly around fittings and stress points. Test all rigging, replacing worn bungees, lines, or hardware before hitting the water. This systematic approach catches small issues before they ruin paddling trips.
Common Mistakes to Avoid
Improper Weight Distribution
One of the most common errors involves ignoring weight capacity ratings or misunderstanding how they apply. A rack rated for “400 pounds” might specify “100 pounds per level,” meaning you can’t load all 400 pounds onto one tier. Exceeding individual level ratings risks catastrophic failure even if total weight seems reasonable.
Uneven loading creates additional problems. Placing heavy fishing kayaks on one side of a freestanding rack while leaving the other side empty can cause tipping. Wall-mounted systems with asymmetric loading experience uneven stress that can pull mounting bolts loose. Distribute weight as evenly as possible across all rack sections and levels.
Dynamic loading during kayak placement exceeds static weight by 20-50%. When you lift a 70-pound kayak onto a rack, the momentary force as you set it down can spike to 100+ pounds. Quality racks account for this in their ratings, but budget systems might only consider static weight. Always choose systems with capacity exceeding your kayak weight by at least 30% for safety margin.
Insufficient Wall/Ceiling Mounting
Attempting to mount racks to drywall without hitting studs represents the most dangerous installation mistake. Drywall anchors, even “heavy duty” versions, cannot safely support kayak weight long-term. The vibration from garage door operation, temperature changes, and normal settling will work anchors loose, leading to eventual failure.
Using inadequate fasteners is similarly risky. Wood screws lack the holding power of proper lag bolts for heavy loads. Using fasteners shorter than recommended fails to engage enough wood for secure mounting. If manufacturer specifications call for 3-inch lag bolts, don’t substitute 2-inch versions hoping they’ll suffice—they won’t.
Failing to reinforce ceiling joists when needed creates overhead hazards. Older homes might have joists spaced too far apart or constructed from smaller lumber than modern standards. If your kayak storage position falls between joists, install proper bridging boards to distribute load across multiple joists. The small additional cost and effort prevent potentially serious accidents.
Ignoring Kayak Orientation
Storing kayaks in improper orientations accelerates hull damage. Never hang kayaks by their grab handles or toggles for extended periods—these handles are designed for carrying, not long-term suspension. The concentrated stress can damage handle attachment points and deform hulls near handles.
Positioning kayaks directly on sharp rack edges without padding creates pressure points that deform hulls over time. This “oilcanning” effect causes permanent hull warping that affects paddling performance and can even compromise structural integrity. Always use padded supports or ensure racks have rounded, wide contact surfaces that distribute weight broadly.
Some paddlers make the mistake of storing kayaks cockpit-up, allowing moisture, dust, and debris to accumulate inside. The correct orientation is typically cockpit-down (hull-up) for ceiling storage or on-edge for wall storage. These positions prevent contamination and promote air circulation. Consult your kayak manufacturer’s storage recommendations—some materials or designs have specific orientation requirements.
Maximizing Garage Space Efficiency
Multi-Purpose Storage Solutions
Integrating water sports gear organization into your kayak storage creates comprehensive systems that maximize utility. Many wall mounted kayak hanger designs include built-in paddle storage hooks, keeping critical accessories together with boats. This integration eliminates searching for paddles when you’re eager to hit the water.
Consider combination storage that accommodates multiple equipment types. Some freestanding racks adjust to hold kayaks, paddleboards, canoes, and even bikes on different levels. This flexibility proves valuable as your outdoor recreation interests evolve. Adjustable arms and customizable spacing let one rack serve multiple purposes across seasons.
Overhead ceiling space often goes underutilized. While your main kayak storage might occupy primary ceiling areas, auxiliary gear can hang from remaining space. PFDs, dry bags, fishing gear, and camping equipment all hang easily from simple hooks installed between kayak hoists. This vertical storage approach transforms “dead” ceiling space into valuable organization real estate.
Organizing Accessories
Creating dedicated zones for kayaking accessories keeps everything accessible and prevents clutter. Wall-mounted pegboards near kayak storage hold paddles, spray skirts, PFDs, and other frequently-used items. Transparent storage bins on shelves organize smaller accessories like dry bags, first aid kits, and repair supplies.
Paddle storage deserves special attention since paddles are long, awkward, and easily damaged. Horizontal paddle racks mounted on walls keep paddles organized and protected. Some kayakers prefer vertical paddle storage in corners, using simple PVC pipe sections or dedicated paddle holders. Position paddle storage within easy reach of your main kayak storage for convenient grab-and-go efficiency.
Safety equipment should remain visible and accessible. PFDs hung on hooks near kayak storage remind you to grab them before launching. First aid kits, rescue equipment, and communication devices deserve dedicated, easily-identified storage positions. This organization habit promotes safety by making critical equipment readily available and encouraging routine inspection.
Vertical Space Utilization
Most garages have 8-12 feet of vertical space that remains largely unused in conventional storage approaches. Thinking vertically transforms cramped garages into spacious, organized environments. Ceiling kayak storage represents the ultimate vertical strategy, lifting boats completely overhead and freeing valuable wall and floor space.
Stacking strategies multiply your storage capacity without expanding garage footprint. Freestanding multi-tier racks let you store 3-6 kayaks in the floor space one kayak would occupy lying flat. Wall systems similarly stack multiple boats vertically, though you’ll need to carefully plan access to lower positions.
The zone approach creates storage layers addressing different needs. Floor level holds frequently-accessed items and heavy equipment. Mid-level wall space stores kayaks and larger gear used regularly. Upper walls and ceiling accommodate seasonal equipment and backup gear. This systematic approach to vertical organization maximizes every cubic foot of garage space while maintaining logical access patterns.
Kayak Storage for Different Garage Sizes
Small Garage Solutions (Single Car)
Single-car garages demand creative storage approaches that balance kayak accommodation with vehicle parking. Ceiling kayak storage often provides the only viable option, lifting boats completely overhead so you can park underneath. Choose low-profile hoist systems that minimize how far kayaks hang down, maximizing clearance for vehicles.
Wall-mounted options work in small garages when you can dedicate one wall to kayak storage. Installing angled supports that project minimally from walls helps kayaks fit without blocking vehicle doors. Some paddlers install kayaks on the wall opposite their vehicle door, maintaining door-opening clearance while utilizing otherwise wasted wall length.
Consider portable freestanding racks that roll outside during paddling season. Store kayaks conveniently near the garage during summer, then roll the rack inside for winter protection. Lockable wheels prevent unwanted movement, and compact designs fit in corner spaces when not actively storing kayaks. This seasonal approach provides flexibility small garages desperately need.
Medium Garage Strategies (Two Car)
Two-car garages offer substantially more storage flexibility. You can typically combine storage approaches—perhaps ceiling storage over one parking space and wall mounts along the sides. This hybrid approach accommodates multiple kayaks while maintaining parking for one or two vehicles depending on kayak positioning.
The side-wall strategy works brilliantly in two-car garages. Install wall mounted kayak hanger systems along both side walls, storing 2-4 kayaks total while keeping the center parking lane clear. Position kayaks at heights allowing vehicle door operation underneath—typically 4-5 feet off the floor provides adequate clearance while remaining accessible for loading and unloading.
Dedicated storage zones in two-car garages create organized, functional spaces. Assign one wall section to kayak storage, another to bikes, and a third to general garage equipment. This zoning prevents storage creep where kayak gear gradually spreads throughout the garage. Clearly defined zones maintain organization and simplify finding specific equipment.
Large Garage Organization (Three+ Car)
Spacious three-car garages enable comprehensive storage systems that accommodate serious paddling collections. Multi-boat wall systems can line entire walls, storing 6-8 kayaks while leaving ample parking space. Freestanding multi-tier racks offer another option, creating dedicated kayak zones without wall mounting.
Consider creating a complete paddling center within your large garage. Dedicate one bay or corner to kayak storage, maintenance, and gear organization. Install workbenches for kayak repairs, pegboards for tools and accessories, and comprehensive storage covering everything from boats to safety equipment. This dedicated space streamlines all kayaking-related activities.
Large garages allow future expansion planning. Install storage systems with room for additional kayaks, anticipating collection growth. Standardizing on one manufacturer’s ecosystem simplifies adding storage sections as needs evolve. Some paddlers design their systems to accommodate friends’ kayaks for group trips, turning garages into community paddling hubs.
❓ Frequently Asked Questions
❓ Can I store my kayak outside year-round using a garage rack?
❓ How much weight can a typical kayak storage rack for garage hold?
❓ Do I need special tools to install a wall mounted kayak hanger?
❓ What's the difference between storing kayaks horizontally versus vertically?
❓ Can canoe storage solutions work for kayaks too?
Conclusion: Choose the Right Storage Solution
Selecting the perfect kayak storage rack for garage use transforms chaotic spaces into organized paddling headquarters. Whether you opt for the budget-friendly RAD Sportz Kayak Hoist, the comprehensive StoreYourBoard G-Kayak Wall Rack, or the massive capacity WALMANN 6-Tier Freestanding Rack, the right choice depends on your specific needs, space constraints, and budget.
Remember that proper storage extends your kayak’s lifespan while keeping your garage functional and safe. Ceiling kayak storage maximizes space utilization, wall mounted kayak hanger systems provide easy access, and freestanding options deliver flexibility. Each approach offers distinct advantages that align with different garage configurations and kayak collections.
The investment in quality storage pays dividends through protected equipment, organized spaces, and eliminated frustration when you’re eager to paddle. Take measurements, assess your needs honestly, and choose systems that accommodate growth. Your future self will thank you every time you walk into an organized garage rather than navigating around kayaks blocking doorways and parking spaces.
Start with the storage solution that addresses your immediate needs, knowing you can expand and modify as your paddling passion grows. The seven products reviewed here represent proven options that thousands of kayakers trust. Your perfect kayak storage rack for garage awaits—choose wisely and enjoy the organized, accessible storage that makes every paddling adventure start smoothly.
Recommended for You
- 7 Best Ski and Snowboard Storage Racks 2026
- 7 Best Golf Equipment Storage Organizer Solutions for 2026
- 7 Best Fishing Rod Storage Rack for Garage 2026
Disclaimer: This article contains affiliate links. If you purchase products through these links, we may earn a small commission at no additional cost to you.
✨ Found this helpful? Share it with your friends! 💬🤗