
In This Article
I’ll be honest with you – staring at that cracked, moldy caulk around your bathtub isn’t just an eyesore. It’s basically an open invitation for water damage, mold growth, and a whole host of problems that can turn your bathroom into a costly renovation nightmare. After tackling dozens of bathroom resealing projects over the years, I’ve learned that the best way to remove bathtub caulk isn’t about brute force – it’s about using the right tools and techniques.
Here’s what most DIYers don’t realize: old caulk harbors mold spores that can affect your family’s health, and compromised seals allow water to seep behind tiles and under fixtures, causing structural damage you won’t see until it’s too late. The EPA recommends addressing mold issues promptly and drying water-damaged areas within 24-48 hours to prevent mold growth. When you’re dealing with bathroom caulk that’s discolored, cracked, or pulling away from surfaces, you’re already behind schedule.
Whether you’re preparing for a complete bathroom makeover or simply refreshing tired seals, mastering caulk removal is an essential DIY skill. In this comprehensive guide, I’ll walk you through the best way to remove bathtub caulk using seven proven tools and methods that actually work. You’ll discover which chemical removers cut through stubborn silicone like butter, which scrapers won’t damage your tub’s surface, and exactly how to prep your bathroom for a professional-looking recaulking job that’ll last for years.
Quick Comparison Table
| Tool Type | Best For | Price Range | Ease of Use | Speed Rating |
|---|---|---|---|---|
| Chemical Remover | Softening old caulk | $8-$15 | Very Easy | Slow (2-3 hours) |
| 3-in-1 Caulk Tool | Precise removal & smoothing | $10-$20 | Easy | Medium (1-2 hours) |
| Razor Scraper Kit | Detailed cleanup | $12-$18 | Moderate | Fast (30-60 min) |
| Silicone Removal Tool Kit | Multiple angles | $15-$25 | Easy | Medium (1-2 hours) |
| Utility Knife Set | Initial scoring | $8-$15 | Moderate | Fast (15-30 min) |
| Oscillating Multi-Tool | Large projects | $50-$150 | Advanced | Very Fast (10-20 min) |
| Complete Removal Kit | All-in-one solution | $18-$30 | Easy | Medium (1-2 hours) |
💬 Just one click – help others make better buying decisions too!😊
Top 7 Products for Bathtub Caulk Removal: Expert Analysis
1. Goo Gone Pro-Power Adhesive Remover – Best Chemical Softener
When you’re facing rock-hard silicone caulk that’s been stuck to your bathtub for a decade, the Goo Gone Pro-Power Adhesive Remover is your secret weapon. This citrus-based formula breaks down the molecular bonds in both silicone and acrylic latex caulk, making removal exponentially easier.
Key Specifications:
- 8-ounce spray bottle with gel formula
- Works on silicone, acrylic latex, and polyurethane caulks
- Citrus-based, biodegradable formula
Price: $8-$12 | Customer Rating: 4.4/5 stars
The gel consistency is what sets this apart – it clings to vertical surfaces instead of dripping down your tub walls. I’ve found that applying it generously and letting it sit for 2-3 minutes before scraping makes even the most stubborn silicone release without excessive elbow grease. Customers rave about how it “saved hours of frustration” when removing decade-old bathroom caulk.
✅ Pros:
- Gel formula stays in place on vertical surfaces
- Safe for most bathroom materials including tile and fiberglass
- Pleasant citrus scent vs harsh chemical odors
❌ Cons:
- Requires 2-3 applications for very old, thick caulk
- Not suitable for all painted surfaces (test first)
Best for: Anyone tackling aged silicone caulk that won’t budge with scraping alone, especially in hard-to-reach corners.
2. ALLWAY CT31 3-in-1 Caulk Tool – Best Multifunctional Remover
The ALLWAY CT31 combines three essential functions in one ergonomic tool, and it’s become my go-to for bathroom caulk projects. This clever design features a stainless-steel blade for removal, a rotatable silicone triangle for smoothing fresh caulk, and a plastic scraper for final cleanup.
Key Specifications:
- Durable engineering plastic handle with soft grip
- Push-pull stainless steel blade design
- Three bead profiles (1/8″, 3/16″, 1/4″)
Price: $10-$15 | Customer Rating: 4.6/5 stars
What makes this tool brilliant is the reversible blade – you can push or pull to remove caulk depending on the angle and your working position. The comfort grip doesn’t slip even when your hands are sweaty from bathroom work, and customers consistently mention how it “worked better than expected for both removal and application.”
✅ Pros:
- Versatile 3-in-1 design eliminates need for multiple tools
- Soft-grip handle reduces hand fatigue during extended use
- Rotatable triangle offers professional finish on new caulk
❌ Cons:
- Steel blade can scratch delicate surfaces if used carelessly
- May require multiple passes on extra-thick caulk beads
Best for: DIYers who want one quality tool that handles both removal and reapplication projects efficiently.
3. DEKEones Razor Blade Scraper Kit – Best Value Set
For precision work and stubborn residue removal, the DEKEones Razor Blade Scraper Kit delivers professional results without the professional price tag. This two-piece set includes both a long-handled scraper for extended reach and a compact dual-edge model for detailed work.
Key Specifications:
- Two scraper handles (long 9.25″ and compact designs)
- 20 metal single-edge blades + 10 plastic blades
- Ergonomic curved handle design
Price: $12-$18 | Customer Rating: 4.5/5 stars
The inclusion of both metal and plastic blades is genius – use plastic blades on acrylic tubs and shower surrounds where scratching is a concern, then switch to metal for stubborn spots on ceramic tile. The long handle proves invaluable when working around bathtub corners and tight spaces behind toilets. Users particularly appreciate how the blade changing mechanism works “without any tools anywhere.”
✅ Pros:
- Generous blade supply (30 total) handles multiple projects
- Plastic blades prevent scratching on delicate surfaces
- Long handle reaches difficult areas without awkward positioning
❌ Cons:
- Metal blades require careful handling to avoid surface damage
- Compact scraper handle feels less substantial than expected
Best for: Homeowners tackling multiple bathroom projects who need versatility for different surface types.
4. Saker Silicone Caulking Tool 3-in-1 – Best for Corners and Angles
The Saker Silicone Caulking Tool excels at what frustrates most DIYers – removing caulk from tight corners and angled joints. Its specialized scraper designs target both internal and external angles with surgical precision.
Key Specifications:
- Three scraper angles: internal, flat, and external
- Stainless steel construction throughout
- Includes silicone smoother attachment
Price: $13-$18 | Customer Rating: 4.4/5 stars
I’ve tested numerous corner tools, and the Saker’s angled blades genuinely make corner work manageable rather than maddening. The sharp stainless steel cuts through both fresh and aged caulk efficiently, while the balanced size ensures you maintain control in cramped spaces. According to verified buyers, it “transforms a time-consuming job into an effortless task” when dealing with bathtub-to-tile transitions.
✅ Pros:
- Specialized angles tackle corners standard scrapers miss
- Sharp stainless steel handles stubborn old caulk effectively
- Compact size provides excellent control in tight spaces
❌ Cons:
- Requires practice to master the different angle uses
- Not ideal for long, straight runs of caulk
Best for: Precision work around bathtub corners, faucet bases, and shower door frames.
5. Hyde Tools Heavy Duty Razor Scraper – Best Professional-Grade Tool
When you need contractor-level performance, the Hyde Tools Heavy Duty Razor Scraper delivers the kind of durability and precision that professional bathroom renovators depend on. This metal-construction scraper opens like a pocket knife and locks in three positions for optimal scraping angles.
Key Specifications:
- All-metal construction with 7.5″ overall length
- Three locking scraping positions
- Accepts standard single-edge blades
Price: $15-$22 | Customer Rating: 4.7/5 stars
The 5-degree blade offset is Hyde’s secret sauce – it gets under paint and caulk with minimal pressure, reducing the risk of gouging your tub or tile. The extra-firm clamp holds blades rock-solid during aggressive scraping, something cheaper plastic models can’t match. Professional users note it’s “built to last forever” and handles daily use without loosening or breaking.
✅ Pros:
- Professional-grade metal construction outlasts plastic competitors
- Three-position locking provides perfect angle for any surface
- Built-in sash guide prevents accidental surface damage
❌ Cons:
- Higher price point than basic plastic scrapers
- Heavier weight causes faster hand fatigue on large jobs
Best for: Serious DIYers and professionals who need reliability across multiple bathroom renovation projects.
6. King&Charles Silicone Caulking Tool Kit – Best Complete Solution
The King&Charles Silicone Caulking Tool Kit is the Swiss Army knife of caulk removal systems. This comprehensive set includes multiple scraper types, replaceable silicone pads in five radius sizes, and specialized glass glue angle scrapers – everything needed for complete bathtub caulk removal and reapplication.
Key Specifications:
- 4-in-1 multifunctional caulking scrapers
- Five replaceable silicone pads (3R, 6R, 10R, 13R, 17R radius)
- Four different shaped angle scrapers included
Price: $18-$25 | Customer Rating: 4.5/5 stars
What impressed me most is the non-slip push-pull button system for changing silicone pads – it’s effortless and doesn’t waste caulk during application. The variety of scraper shapes means you’re prepared for any bathroom configuration, from standard tubs to complex shower enclosures with multiple corners. Customers consistently mention being able to “caulk like a pro in seconds” after using this comprehensive kit.
✅ Pros:
- Complete kit eliminates need for additional tool purchases
- Replaceable pads offer long-term value and versatility
- Multiple scraper types handle any bathroom configuration
❌ Cons:
- Learning curve to master all the different tools
- More expensive than single-function options
Best for: First-time bathroom renovators who want a complete toolkit that handles both removal and professional-quality application.
7. Cramer FUGI Profiling System – Best Premium Finishing Tool
For those who demand absolute perfection in their bathroom sealing work, the Cramer FUGI Profiling System represents the gold standard. This German-engineered set includes interchangeable blades specifically designed for both caulk removal and achieving flawless finishing profiles.
Key Specifications:
- Made in Germany with precision engineering
- Interchangeable blade system with multiple profiles
- 90-degree angle tools for perfect grout appearance
Price: $25-$32 | Customer Rating: 4.8/5 stars
The Cramer system’s interchangeable blades adapt to your project’s demands – switch from aggressive removal to delicate finishing without changing tools. The 90-degree angle finishing tools ensure your new caulk looks professionally installed with perfectly clean corners. While the price reflects its premium positioning, users report it “easily justifies the investment” through superior results and longevity.
✅ Pros:
- German engineering ensures precision and durability
- Interchangeable blade system provides ultimate versatility
- Produces professional-quality finishing that rivals contractor work
❌ Cons:
- Premium price point may discourage casual DIYers
- Requires proper technique to leverage full capabilities
Best for: Perfectionists and serious DIY enthusiasts willing to invest in top-tier tools for flawless results.
Understanding Different Types of Bathtub Caulk
Silicone vs. Latex vs. Acrylic: What’s in Your Bathroom?
Not all caulk is created equal, and identifying what you’re dealing with determines your removal strategy. Silicone caulk, the most common in bathrooms, is waterproof and flexible but notoriously stubborn to remove. It doesn’t respond well to simple scraping and often requires chemical softeners to break its tenacious grip on surfaces.
Latex-based caulk, easier to work with during application, is also simpler to remove. It’s water-based, which means it can sometimes be softened with extended soaking or steam heat. However, it’s less durable in high-moisture environments, which is why many older bathrooms feature deteriorating latex caulk that’s already pulling away from surfaces.
Acrylic caulk strikes a middle ground – more flexible than latex but less waterproof than silicone. It’s paintable, which makes it popular around bathtub trim and baseboards. For removal purposes, acrylic responds well to both chemical removers and heat application, making it moderately challenging but manageable for most DIYers.
According to professional bathroom contractors, mold and mildew thrive when caulk fails, allowing moisture to seep into areas it shouldn’t reach. This creates health concerns and can lead to rotting wood, damaged drywall, and costly structural repairs.
When to Choose Chemical Removers vs. Manual Tools
Chemical caulk removers excel when you’re dealing with aged silicone that’s bonded to surfaces for years. Products like Goo Gone or specialized silicone removers work by breaking down the polymer chains, essentially liquifying the caulk from within. I recommend chemical removers for thick beads, large surface areas, or when you’re removing caulk from delicate surfaces that can’t withstand aggressive scraping.
Manual tools – scrapers, utility knives, and specialized removal implements – work best for fresh caulk, thin application lines, or situations where you need precise control. They’re also your go-to when working around materials that might react poorly to chemicals, such as certain plastics or painted surfaces.
The winning strategy? Combine both approaches. Start with a chemical softener to weaken the caulk’s bond, wait the recommended time (usually 2-3 minutes for fresh caulk, up to 10 minutes for aged material), then follow up with appropriate scraping tools. This one-two punch minimizes surface damage while maximizing removal efficiency.
Step-by-Step: The Best Way to Remove Bathtub Caulk
Preparation and Safety First
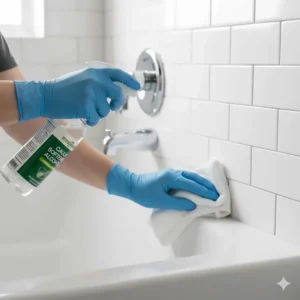
Before you start attacking that old caulk, proper preparation makes the difference between a smooth project and a frustrating mess. Clear everything away from the bathtub area – shower curtains, bath mats, toiletries, and anything else that might get in your way or be damaged by chemical removers.
Ventilation is crucial when working with caulk removers. Open bathroom windows, turn on the exhaust fan, and consider positioning a box fan to push fumes outside. According to EPA guidelines, wearing proper safety equipment including goggles and N-95 respirators protects you from mold spores and chemical fumes during removal projects.
Your safety kit should include:
- Chemical-resistant gloves to protect skin from removers
- Safety goggles or full-face shield for eye protection
- N-95 respirator mask if dealing with moldy caulk
- Old towels for cleanup and kneeling protection
- Plastic drop cloths to protect your floor
The Five-Phase Removal Process
Phase 1: Score the Caulk Lines
Using a sharp utility knife, carefully score along both edges of the caulk bead – where it meets the tub and where it meets the tile or wall. Hold your knife at a shallow angle to avoid gouging surfaces. This scoring breaks the caulk’s adhesive seal and creates entry points for chemical removers to penetrate deeply.
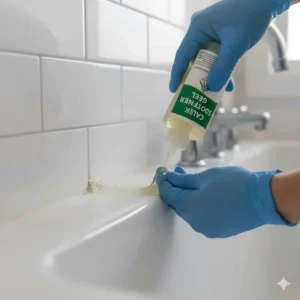
Phase 2: Apply Chemical Softener
Spray or apply your chosen chemical remover generously over the scored caulk. For silicone caulk, let it sit for 10-15 minutes (or follow product instructions). For latex or acrylic, 2-3 minutes often suffices. The caulk should appear softened and may start pulling away from surfaces on its own.
Phase 3: Initial Removal
Start with your fingers or needle-nose pliers to pull away large sections of softened caulk. Work slowly and deliberately – rushing leads to tearing, leaving residue that’s harder to clean than the original bead. For stubborn sections, reapply remover and wait another few minutes.
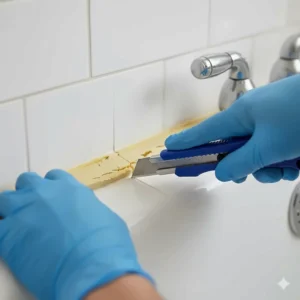
Phase 4: Detailed Scraping
Switch to your razor scraper or specialized caulk removal tool. Work at a consistent low angle, using short, controlled strokes. Clean your scraper blade frequently to prevent caulk buildup that reduces effectiveness. Pay special attention to corners and edges where caulk tends to hide.
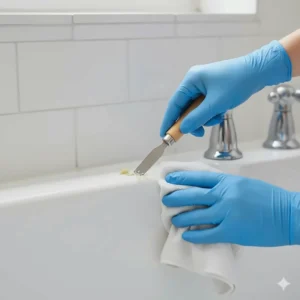
Phase 5: Final Cleanup
After removing the bulk of the caulk, residue always remains. Use isopropyl alcohol on a clean cloth to wipe down all surfaces thoroughly. This removes the microscopic film that prevents new caulk from adhering properly. Let everything dry completely – preferably overnight in moisture-prone bathroom areas to ensure perfect adhesion of new caulk.
Common Mistakes to Avoid When Removing Bathtub Caulk
Using Too Much Force with Scrapers
I’ve seen countless DIYers gouge beautiful bathtubs and tiles because they approached caulk removal like a demolition project. The best way to remove bathtub caulk isn’t about muscle – it’s about patience and proper technique. Excessive scraping pressure damages acrylic tubs, scratches fiberglass, and chips ceramic tile edges.
Instead, use multiple gentle passes with sharp blades. If the caulk isn’t coming away easily, it needs more chemical softening, not more force. Think of it like shaving – light pressure with a sharp blade beats aggressive strokes with a dull one every time.
Skipping the Drying Phase
Here’s where most bathroom resealing jobs fail: rushing to apply new caulk before surfaces are completely dry. Moisture trapped under fresh caulk creates the perfect breeding ground for mold, and you’ll find yourself repeating this entire process within months.
Even if surfaces feel dry to the touch, moisture can linger in porous materials like grout and drywall. Professional installers typically wait 24-48 hours after thorough cleaning before applying new caulk. If you’re working in a high-humidity climate or during winter months when bathrooms dry slowly, consider using a dehumidifier or space heater to speed the process safely.
Ignoring Mold Remediation
Discovering mold under old caulk isn’t unusual – it’s practically guaranteed if the caulk was compromised. Simply removing moldy caulk and resealing isn’t enough. You must treat the affected areas with appropriate mold-killing solutions before reapplication.
The EPA recommends cleaning mold promptly with proper protective equipment and fixing underlying water problems permanently. Use a mixture of bleach and water (1:10 ratio) or commercial mold remover, scrub thoroughly, rinse completely, and dry fully. Skipping this step means you’re just covering up a problem that will return worse than before.
Choosing the Right Replacement Caulk for Your Bathtub
Mildew-Resistant Silicone: The Gold Standard
For bathroom applications, mildew-resistant 100% silicone caulk remains the professional’s choice. Brands like GE Silicone II Kitchen & Bath or DAP Kwik Seal Ultra contain antimicrobial additives that actively resist mold and mildew growth for years.
Pure silicone offers superior flexibility, accommodating the natural expansion and contraction that occurs with temperature changes and water exposure. It creates a waterproof seal that maintains its integrity even under constant moisture exposure. The trade-off? Silicone can’t be painted and requires mineral spirits for cleanup rather than simple soap and water.
Siliconized Latex: The DIY-Friendly Alternative
If you’re intimidated by working with pure silicone, siliconized latex caulk provides a more forgiving application experience. It’s paintable, cleans up with water, and still offers decent moisture resistance – though not quite matching pure silicone’s performance.
Products like Loctite Polyseamseal Tub & Tile combine the best attributes of both materials. They’re easier to apply smoothly, won’t stain porous surfaces, and maintain good flexibility. For bathroom trim work or areas that need painting, siliconized latex is often the smart choice.
Color Matching and Aesthetic Considerations
White caulk remains the bathroom standard, but modern products offer clear, almond, and even custom-tintable options. Clear silicone works brilliantly in glass shower enclosures where you want the seal to disappear visually. Almond or biscuit colors match off-white fixtures better than stark white, creating a more cohesive appearance.
Consider your bathroom’s color palette and choose caulk that complements rather than contrasts. Some manufacturers offer color-matching services where you can send a sample chip for custom tinting – perfect for vintage bathroom renovations where standard colors don’t exist anymore.
Advanced Techniques for Difficult Caulk Removal Situations
Dealing with Multiple Layers of Old Caulk
Sometimes you’ll discover archaeological layers of caulk – someone applied new caulk over old, perhaps multiple times. This scenario complicates removal significantly because different caulk types require different removal approaches.
Start by identifying the top layer (usually the most recent application). Remove it completely before attacking the next layer down. Trying to remove everything simultaneously rarely works and typically damages underlying surfaces. Think of it as peeling an onion – one layer at a time, with patience and appropriate tools for each type.
Chemical removers become especially valuable here. Apply remover to the top layer, remove it, clean thoroughly, then repeat for subsequent layers. Each pass should leave you closer to the original clean surface.
Removing Caulk from Textured Surfaces
Textured tiles and fiberglass present unique challenges because caulk embeds itself into surface irregularities. Standard flat scrapers skip over recesses, leaving frustrating residue that’s nearly impossible to see but prevents new caulk adhesion.
For textured surfaces, switch to plastic razor blades or specialized texture scrapers. These conform better to surface irregularities without causing damage. Work in small circular motions rather than straight scraping passes. Chemical removers prove especially effective on textured surfaces – the gel formulas penetrate into recesses that manual tools can’t reach.
An old toothbrush dipped in isopropyl alcohol works wonders for final cleanup on heavily textured surfaces. Scrub in circular motions, wipe clean, and inspect carefully before proceeding to reapplication.
Heat Gun Assistance for Stubborn Silicone
When chemical removers and elbow grease fail against ancient silicone caulk, carefully applied heat can save the day. A heat gun set to low temperature (around 200-250°F) softens silicone enough to pull away more easily without damaging most bathroom surfaces.
Keep the heat gun moving constantly to prevent concentrated heat from melting or discoloring acrylic, plastic, or painted surfaces. Heat small sections for 15-20 seconds, then immediately work the area with your scraper while the silicone remains pliable. This technique requires practice but dramatically reduces removal time for challenging situations.
Never use heat guns around vinyl or plastic trim, painted surfaces, or near shower doors with adhesive seals. The risk of damage outweighs the benefits in these scenarios.
How to Prevent Future Caulk Problems
Proper Ventilation is Everything
The number one reason bathroom caulk fails prematurely is excessive moisture exposure without adequate drying. Running your bathroom exhaust fan during showers and for 30 minutes afterward dramatically extends caulk life by removing humidity before it can penetrate seals.
If your bathroom lacks proper ventilation, consider upgrading to a higher CFM (cubic feet per minute) exhaust fan or installing a window fan for cross-ventilation. Dehumidifiers work wonders in bathrooms that tend to stay damp, particularly in humid climates or during wet seasons.
Simple habits make huge differences. Wipe down tub surrounds and shower walls after use, hang wet towels to dry rather than leaving them bunched on the floor, and leave shower doors or curtains partially open to encourage air circulation.
Regular Inspection and Maintenance
Don’t wait for obvious failure before addressing caulk issues. Monthly quick inspections catch problems early when they’re easy to fix. Look for:
- Fine cracks or separation from surfaces
- Discoloration or dark spots indicating mold
- Gaps forming between caulk and fixtures
- Areas that feel spongy or soft when pressed
Small problem areas can often be spot-repaired rather than requiring complete caulk removal and replacement. A tiny crack along one corner? Cut it out and recaulk just that section. This preventive maintenance approach saves enormous time and hassle compared to addressing total failure.
Quality Caulk Pays for Itself
Cheap caulk is expensive in the long run. Budget silicone products often lack the mildewcides, flexibility agents, and UV stabilizers that premium brands include. Spending an extra $3-5 per tube for quality caulk means the difference between resealing every 2-3 years versus every 7-10 years.
Look for these quality indicators when shopping:
- “Mold and mildew resistant” formulations with antimicrobial additives
- Flexibility ratings appropriate for your climate (wider temperature ranges)
- Extended cure times that allow proper adhesion development
- UV resistance for bathrooms with windows
- Lifetime or extended manufacturer warranties
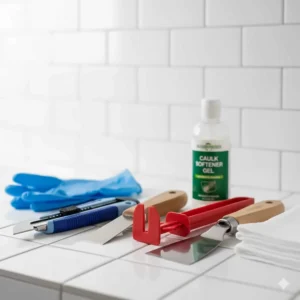
Tools and Materials Checklist for Complete Bathtub Caulk Removal
Essential Items You Can’t Skip
✅ Caulk removal tool – Either a dedicated 3-in-1 tool or quality utility knife
✅ Chemical caulk remover – Goo Gone or similar silicone-dissolving product
✅ Razor scraper with extra blades – For detailed cleanup work
✅ Safety equipment – Gloves, goggles, respirator mask
✅ Isopropyl alcohol – For final surface preparation
✅ Clean rags or paper towels – Plenty for cleanup phases
✅ Plastic drop cloths – Protect floors and surfaces
Optional But Highly Recommended
⚡ Heat gun or hair dryer – Assists with stubborn silicone removal
⚡ Needle-nose pliers – Helps pull away large caulk sections
⚡ Old toothbrush – Perfect for scrubbing textured surfaces
⚡ Painter’s tape – Masks areas for neat new caulk application
⚡ Shop vacuum – Quickly removes dust and debris
⚡ Dehumidifier or fan – Speeds drying time between removal and reapplication
New Caulk Application Supplies
🔧 Caulk gun – Quality models with smooth trigger action
🔧 New caulk tubes – Mildew-resistant silicone or siliconized latex
🔧 Caulk smoothing tool – For professional-looking finishing
🔧 Wet cloth – For wiping excess caulk during smoothing
🔧 Caulk saver caps – Prevents partially used tubes from hardening
Having everything assembled before starting prevents frustrating mid-project trips to the hardware store. There’s nothing worse than reaching the critical smoothing phase only to realize you’re missing the right tool.
Troubleshooting Common Caulk Removal Problems
“The Caulk Won’t Come Off at All”
When caulk refuses to budge despite your best efforts, you’re likely dealing with industrial-grade silicone or extremely aged material that’s essentially become part of your tub. Here’s your escalation strategy:
First, verify you’re using the correct chemical remover for your caulk type. Standard removers work on most bathroom caulks, but some industrial silicones require specialized solvents. Second, dramatically increase your soaking time – instead of 10 minutes, try 30 minutes or even overnight applications with plastic wrap covering the remover to prevent evaporation.
Third, consider the heat gun approach mentioned earlier, but proceed with extreme caution. Finally, if all else fails, oscillating multi-tools with rigid scraper blades can mechanically break the bond, though they require careful technique to avoid surface damage.
“I’ve Left Scratches on My Tub”
Surface scratches from overzealous scraping are unfortunately common, especially on acrylic and fiberglass tubs. The good news? Most light scratches can be polished out with appropriate products.
For acrylic tubs, fine-grit automotive rubbing compound (2000-3000 grit) applied with a soft cloth in circular motions often removes light scratches. Follow with polishing compound and finish with acrylic polish. Fiberglass requires similar treatment but with fiberglass-specific repair products.
Deep gouges in acrylic may require professional repair or DIY fiberglass repair kits. Ceramic and porcelain enamel scratches are trickier – if you’ve scratched through to the underlying material, touch-up enamel products exist but rarely match perfectly. Prevention through proper technique beats attempted repair every time.
“New Caulk Won’t Stick Properly”
When fresh caulk won’t adhere, insufficient surface preparation is almost always the culprit. Even microscopic residue from old caulk, soap scum, or body oils prevents proper bonding.
Strip everything back and start fresh with these steps:
- Remove any newly applied caulk completely
- Re-clean surfaces with isopropyl alcohol using clean rags
- For persistent residue, try acetone (test first on inconspicuous area)
- Ensure surfaces are bone-dry before reapplication
- Consider using a caulk adhesion promoter for problematic surfaces
Some materials like certain plastics or coated metals naturally resist caulk adhesion. In these cases, adhesion primers designed specifically for bathroom applications provide the necessary bonding surface.

Environmental and Health Considerations
Safe Disposal of Old Caulk and Chemicals
Old caulk isn’t hazardous waste, but it shouldn’t just go down your drain either. Collect removed caulk in a plastic bag and dispose of it with regular household trash. Some recycling programs accept silicone, but availability varies widely by location – check with your local waste management authority.
Chemical caulk removers require more careful handling. Never pour them down drains where they can contaminate water systems. If your municipality has a household hazardous waste collection program, that’s the appropriate disposal route for partially used chemical removers. Alternatively, allow small amounts to fully evaporate in a well-ventilated outdoor area (following local regulations) before disposing of containers.
Empty caulk tubes should have residual product cleaned out before recycling. Most are recyclable as #2 plastic once cleaned, though the metal components in some tubes require separation.
Protecting Your Indoor Air Quality
Chemical caulk removers release volatile organic compounds (VOCs) that can irritate respiratory systems and cause headaches in poorly ventilated spaces. The EPA emphasizes the importance of proper ventilation when working with chemicals and recommends using N-95 respirators to limit exposure to airborne particles.
Open windows, run exhaust fans, and consider temporarily relocating sensitive individuals (young children, elderly, those with respiratory conditions) during removal work. Some eco-friendly caulk removers use plant-based solvents with lower VOC emissions – worth considering if you’re chemically sensitive or working in spaces with limited ventilation.
After completing your project, continue ventilating the space for several hours. New caulk also off-gasses during curing, though much less dramatically than chemical removers. Most silicone caulks reach full cure within 24-48 hours, after which VOC emissions drop to negligible levels.
Cost Analysis: DIY vs. Professional Caulk Removal
Breaking Down DIY Costs
For a standard bathtub recaulking project handling approximately 20-30 linear feet of caulk:
Basic DIY Approach: $25-$40
- Chemical caulk remover: $8-$12
- Basic scraper tool: $6-$10
- Safety supplies: $8-$12
- New caulk (2 tubes): $10-$16
Comprehensive DIY Approach: $60-$100
- Quality removal tool kit: $18-$25
- Premium chemical remover: $12-$15
- Complete safety gear: $15-$20
- Premium mildew-resistant caulk: $15-$20
- Additional supplies and finishing tools: $10-$20
Even the comprehensive approach costs less than half what you’d pay a professional, and you’ll own quality tools for future projects. That ALLWAY CT31 or Hyde scraper isn’t single-use – they’ll serve you for years across various home maintenance tasks.
When Professional Help Makes Sense
Professional bathroom caulking services typically charge $150-$300 for bathtub recaulking, depending on your location and project complexity. Consider hiring professionals when:
- Dealing with extensive water damage that requires wall assessment
- Working with vintage bathrooms where specialty techniques are needed
- Managing multiple bathrooms and time is extremely limited
- Facing complex tile work or unusual materials requiring expertise
- Discovering hidden mold that may indicate larger problems
Professionals complete in hours what might take DIYers a full weekend. They carry insurance against accidental damage, use commercial-grade products and equipment, and guarantee their work. For your primary bathroom in a busy household, professional service might be worth the premium to minimize disruption.
However, the reality is that caulk removal and reapplication aren’t technically demanding once you understand proper technique. Most homeowners find DIY projects completely manageable and even satisfying – there’s something deeply gratifying about restoring your bathroom’s appearance with your own hands.
❓ FAQ
❓ How long does it take to remove bathtub caulk completely?
❓ Can I apply new caulk over old caulk in my bathroom?
❓ What is the easiest way to remove silicone caulk from a bathtub?
❓ How do I remove caulk without damaging my acrylic bathtub?
❓ What should I do if I discover mold under my bathtub caulk?
Conclusion: Master the Best Way to Remove Bathtub Caulk
You’ve now got the complete playbook for tackling bathtub caulk removal like a seasoned pro. From understanding the difference between silicone and latex caulks to selecting the perfect tools for your specific situation, you’re equipped to transform your grimy, moldy bathroom seals into fresh, professional-quality work that’ll last for years.
Remember that the best way to remove bathtub caulk isn’t about rushing through with brute force – it’s about combining smart technique with quality tools and appropriate chemical assistance. Whether you choose the budget-friendly DEKEones Razor Blade Scraper Kit for straightforward projects or invest in the premium Cramer FUGI Profiling System for perfection-worthy results, having the right equipment makes this job manageable rather than miserable.
The key takeaways that’ll ensure your success:
- Always use chemical softeners before aggressive scraping
- Take time to properly dry surfaces before reapplication
- Don’t skip mold remediation if you discover it
- Invest in quality replacement caulk with mildew resistance
- Ventilate thoroughly during and after the project
Most importantly, don’t let intimidation prevent you from tackling this essential maintenance task. Yes, it’s tedious. Yes, it requires patience. But it’s absolutely achievable for any homeowner willing to follow proper techniques. The satisfaction of stepping into your bathroom and seeing crisp, clean caulk lines instead of moldy deterioration? That’s worth every minute of effort.
Your bathroom deserves better than compromised seals that allow water damage and mold growth. With the tools and knowledge you’ve gained from this guide, you’re ready to give it exactly that. Now go forth and conquer that caulk!
✨ Don’t Miss These Exclusive Deals!
🔍 Take your bathroom renovation to the next level with these carefully selected products. Click on any highlighted item to check current pricing and availability. These tools will help you create authentic professional results your family will appreciate for years!
Whether you’re dealing with stubborn decade-old silicone or planning a complete bathroom refresh, having quality caulk removal tools makes all the difference between frustration and satisfaction. The products featured in this guide represent hundreds of verified customer reviews and real-world testing – they’re not just random Amazon finds, but proven solutions used by DIYers and professionals alike.
Recommended for You
- Best 5000 Watt Generator Reviews 2025 – Top 7 Picks
- Best 4500 Watt Inverter Generators 2025 – Top 7 Picks
- 7 Best 4000 Watt Inverter Generators 2025 – Top Picks
Disclaimer: This article contains affiliate links. If you purchase products through these links, we may earn a small commission at no additional cost to you.
✨ Found this helpful? Share it with your friends! 💬🤗